View All


 View All


 View All


 View All


Gong hei fat choi Sassy Mamas! Wishing you and your family a happy, healthy and prosperous new year of the Goat! I had a lot of fun making these Chinese New Year cupcake toppers over the CNY holidays and I am sure your little ones will love them too! Have fun with these!
Raspberry Surprise White Chocolate Cupcakes
Total time for baking and making buttercream: 1 – 2 hours
Makes: 12 cupcakes
Ingredients
- 250g Organic plain flour
- 2 tsp Baking powder
- 200g Caster sugar
- 1 Organic free range egg
- 1 cup whole milk
- 50g melted organic butter, cooled
- 80g raspberries, fresh or thawed from frozen are good too
- 100g Ghirardelli white chocolate chips or other brands would do too
Method
- Preheat the oven to 190C and line your cupcake tray with pretty cupcake cases.
- Melt the butter in a small saucepan and allow it to cool down.
- In a large bowl mix together the plain flour, baking powder and sugar.
- In a small bowl, whisk together egg, milk and cooled melted butter.
- Add the liquid mixture to the dry ingredients along with the white chocolate chips. Using a large spoon, mix until just combined.
- Spoon the cake batter into the cupcake cases to 2/3 full and add 1 raspberry per cupcake batter.
- Bake for 20-25 min, or until a skewer comes out clean and cupcakes are golden.
Kaman’s staple buttercream frosting
Ingredients
140g organic butter
280g icing sugar
1-2 teaspoon of whole milk
Few drops of your favourite flavour extract e.g. almond or vanilla
Food colouring of your choice (optional)
5 simple steps to follow:
- Ensure the organic butter is at room temperature. Beat the butter in a large bowl until soft.
- Add half of the icing sugar and beat until combined.
- Add the remaining icing sugar and if required, 1 teaspoon of milk to loosen it up. You can play around with this to reach your desired level of creaminess! Tip: taste whilst adding more icing sugar and stop once you have reached your desired level of sweetness.
- You can add a few drops of your favourite flavour extract to change it up if you like – be creative!
- Once you are happy with the consistency of your buttercream frosting (nice and fluffy!), add your food colouring. The key is to add small amounts first until you have reached your desired colour intensity.
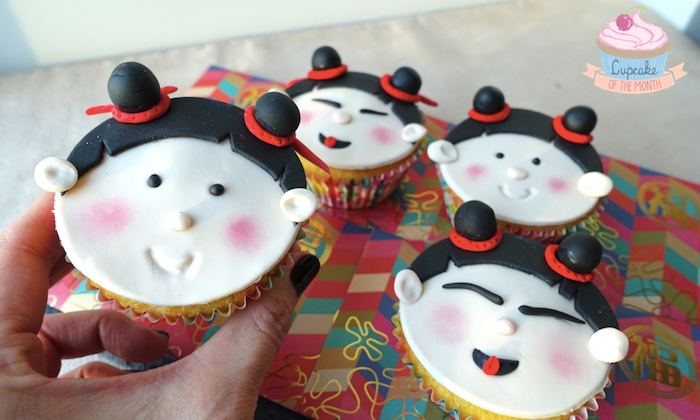
Cheeky Chinese Girl Chinese New Year Cupcakes
I would make these cupcake toppers at least a day ahead, so that the fondant has enough time to harden properly. You are welcome to use these cupcake toppers sitting on top of a thin layer of buttercream frosting or a generous swirl of buttercream frosting instead.
You will need the following ingredients/equipment:

- Corn flour & icing sugar mix (for dusting your fondant rolling mat in order to prevent the fondant from sticking to the surface)
- Wilton brown food colouring
- Three different coloured fondants (Buy black and red fondant from the shops as it is hard to make it yourself at home. The skin colour toned fondant is made by adding small amounts of brown to white fondant. Simply dip a cocktail stick into the brown food colouring and smear the colour onto the fondant. Mix in the colour by stretching and pulling the fondant to mix well. Remember you can always add more colour so start with a small amount.)
- 7cm diameter circular cookie / fondant cutter
- 9 inch fondant roller by Wilton with pink guide rings (approx. 0.2cm thick)
- Small paint brush for dusting edible colour dust only
- Edible colour dust by Wilton
- Fondant cutter
- Selection of fondant decorating tools
- Cocktail sticks
- Small paint brush for fondant glue
- Purple guide rings for fondant roller (approx. 0.3cm thick)
- Wilton “Dab N Hold” edible fondant glue
- Spatula
We will be making two designs for the Chinese girl cupcake topper, let’s start with the cute one with the round eyes first:
Step 1. Roll out about 0.3 cm thick of skin colour fondant using the purple-guided rings on a dusted surface. Use the cookie cutter to cut out a circular disc and rest aside on a dusted surface.
Step 2: Repeat as per step 1 but with the black fondant.
Step 3: Place the cookie cutter about 1/3 way down and cut a “new moon” shape fondant out. This will be the hair for the girl.
Step 4: Using the cutter, trim some of the black fondant off to create a fringe for the hair.
 Step 5: Repeat step 4 for the other cupcake toppers. For the hair buns, simply roll up some fondant balls using the black fondant. Feel free to create any size as you feel they look appropriate.
Step 6: Using the fondant glue brush, dab some of the edible glue along the hair and the buns and glue them down.
Step 7: Using the small rounded head fondant tool, gently press in eyes, nose and dimples on the fondant as shown. Then use the fondant tool to create a smile by joining the two dimples together.
Step 8: Roll up 2 small rounded balls of the skin coloured fondant for the girl’s ears. Using the fondant tool to create the holes in the ears. Using the fondant brush, dab some edible glue to stick the ears down.

Step 9: Using the colour dust brush, dab a very small amount of the edible pink dust to give her rosy cheeks! Just like applying make up, you can use a fingertip t blend in the blusher.
Step 10: Using small amount of the red fondant, roll out a thin long piece of fondant for the ribbon to wrap around the hair buns. Using the fondant brush, apply small amount of the edible glue (or just tiny amount of water) in order to stick down the ribbon.
Step 11: Use the fondant tool to add some stitching effect along the ribbon.
Step 12: Just need to add a pair of cute eyes and you are done! Simply roll up two tiny balls using some black fondant. Apply a small amount of edible blue to glue them down.
 For the second design of the Chinese girl with the biggest smile, simply repeat step 1 – 6 first then follow the remaining steps below:
Step 13: Use the rounded head fondant tool to gently press in the nose and dimples, then create a smile by joining the two dimples together. Apply some blusher for her rosy cheeks by using the edible pink dust as before. Use the wider end of the fondant tool to create a smile by joining the two dimples together. Use the pointy end of the fondant tool to gently draw out the smiley eyes.
Step 14: Roll out a small ball of black fondant and flatten it down. Cut it in half and shape one piece to be used for the mouth.
Step 15: Using a small piece of red fondant, roll up a small teardrop shape and flatten it down gently using your fingertips. Using the smaller end of the fondant tool, press a small indent and glue it down over the mouth with the edible glue.
Step 16: Using small amount of the red fondant, roll out a thin long piece of fondant for the ribbon to wrap around the hair buns. Using the fondant brush, apply small amount of the edible glue (or just tiny amount of water) in order to stick down the ribbon. Lastly, add some stitching effect.
 Wishing you all a very happy new year of the Goat, filled with joy, laughter and lots of happy memories with your nearest and dearest!