View All


 View All


 View All


 View All


 Post Category - ChristmasChristmas
I hope you will find this month’s Christmas Wonderland Cupcakes super easy and fun to make, and to get your kids involved too! You can make the fondant decorations in advance, so that you don’t have a mad rush to get everything ready on the same day. Merry Christmas everyone, have a great time with your family and friends and I hope Santa brings many nice presents!
Kaman’s Vanilla Cupcakes
Total time: 1.5-2 hours
Makes: 16-18 cupcakes
Ingredients:
- 250g organic self-raising flour
- 250g organic unsalted butter
- 250g caster sugar
- 4 large organic free-range eggs
- ½ teaspoon baking powder
- 1 vanilla pod
Method:
1. Preheat the oven to 180C and line your cupcake tray with your festive cupcake paper cases.
2. Whisk together the butter and the sugar until white and fluffy. Tip: As the weather is a lot cooler during this time of year, you must bring the butter to room temperature so that it is quite soft in texture.
3. When your butter and sugar mixture is ready, whisk in the eggs one by one.
4. When all the eggs are incorporated, remove bowl from your electric mixer and use spatula from now on. Add the self-raising flour and the baking powder into the butter mixture.
5. Very gently fold the mixture with a spatula. Try and use as few folds as possible to ensure all of the flour is mixed in well, but you don’t want any lumps either.
6. Split the vanilla pod and scrape all of the seeds using the back of a knife and add these gorgeous little seeds into the cake mixture. Gently mix the vanilla pods in.
7. Divide the cake mixture evenly into the cupcake cases 2/3 of the way full.
8. Place the cupcake tray in the oven for 18-20 minutes. Start testing from 18 mins using a cocktail stick to poke in the middle – if it comes out clean the cupcakes are done! Remove them onto a cooling rack until they are completely cooled before icing.
Kaman’s Staple Buttercream Frosting
Ingredients:
- 140g organic butter
- 280g icing sugar
- 1-2 teaspoons of whole milk
- Few drops of your favourite flavour extract e.g. almond or vanilla
- Food colouring of your choice (optional)
5 simple steps to follow:
1. Ensure the organic butter is at room temperature. Beat the butter in a large bowl until soft.
2. Add half of the icing sugar and beat until combined.
3. Add the remaining icing sugar and if required, 1 teaspoon of milk to loosen it up. You can play around with this to reach your desired level of creaminess! Tip: Taste while adding more icing sugar and stop once you have reached your desired level of sweetness.
4. You can add a few drops of your favourite flavour extract to change it up if you like – be creative!
5. Once you are happy with the consistency of your buttercream frosting (nice and fluffy!), add your food colouring. The key is to add small amounts first until you have reached your desired colour intensity.
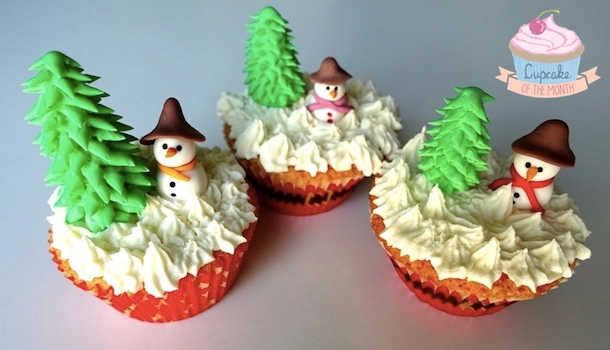
Christmas Wonderland Cupcakes
I would make these cupcake toppers at least a day ahead, so that the fondant has enough time to dry properly. Feel free to change the colour combination for the snowman’s accessories as you wish, but obviously the Christmas tree has to be green!
You will need the following ingredients/equipment:
- 50:50 mix of white gum paste & white fondant
- Food colouring
- Food grade colouring pen
- Uncooked spaghetti sticks
- Cocktail sticks
- A new pair of nail scissors
Step 1: The ratio is 50:50 for gum paste and fondant, so if you need more just follow this rule of thumb. The gum paste will harden the Christmas tree and snowmen so that they will keep the shape better. If you are in a hurry, the gum paste will also help to dry the ribbon bows much quicker.
Simply combine by pressing both ingredients together and start stretching and pulling the mixture apart. Repeat this action until well mixed.
You can start dividing up this mixture into different colours for the Christmas tree and the snowmen’s scarves & hat by adding the relevant food colouring. Simply dip a cocktail stick into the food colouring you want and then smear onto the fondant, continuing to use the stretch and pull technique as above. Remember you can always add more colour so start with a small amount. Tip: If the heat from your hands is making the fondant too sticky, rub some shortening (butter or grease) in your palms first.
Step 2: Let’s make the Christmas trees first! Take some of the green fondant and roll into a ball approximately 3cm diameter wide.
Step 3: Putting the fondant ball in the centre of your palm, place your index and middle finger half way up the fondant ball and start rolling up and down gently, so that you are slowly stretching this half of the fondant into a cone shaped fondant.
Step 4: As a guide you want the cone shaped fondant to be approximately 5-6cm tall. If you need to adjust the height, it may help to place the cone shaped fondant standing up right on a dusted surface and place both index and middle fingers on both side of the fondant and start twisting & turning to achieve a better cone shaped fondant.
 Step 5: Insert a cocktail stick into the flatter end of the cone shaped fondant, about halfway through. You need to use delicate fingers to do this without pressing fingerprints onto the fondant!
Step 6: Using a new pair of nail scissors, starting from the top of the fondant simply cut at about a 45 degree angle all the way round. Tip: It may take some trial & error to work out how deep you want to cut into the fondant. You may also wish to lift the fondant up as you withdraw the scissors, so that the leaves are flicked upwards.
Step 7: As you cut more layers further down the fondant, you want to follow a “zigzag” pattern which creates a more natural effect. Keep going until you get all the way to the bottom of the fondant.
Step 8: Using a fondant tool as shown in the picture or a cocktail stick, you may wish to adjust some of the leaves to flick out more to give the fondant tree a fuller look. When you are happy with your tree, poke your finished product onto a piece of vegetable (I used a large sweet potato!) and set aside overnight for it to dry properly.
 Step 9: Let’s make snowmen next! Take some of the white fondant and roll 2 balls into 1) 1cm diameter wide 2) 1.5cm – 2cm diameter wide.
Step 10: Break a short piece of dried spaghetti and insert it in the bigger fondant ball, which is the body of the snowman. If required cut the spaghetti shorter before you push the smaller fondant ball on top, which is the head of the snowman.
Step 11: Using your pre-coloured fondant for the snowman’s scarf, roll out a very thin strip and simply wrap around the snowman’s neck. If you like, dab very small amount of water to help it stick onto its body.
Step 12: Using the food grade colouring pen, draw the eyes and buttons onto the snowman’s body.
 Step 13: For the snowman’s hat, using your pre-coloured fondant, roll a small ball and shape it like a Hershey’s chocolate (small cone shaped).
Step 14: Place the cone on your index finger tip and use your other index finger to gently roll down the sides from the tip of the fondant and flatten the fondant at the bottom in the shape of a hat.
Step 15: You can dab a little bit of water underneath the hat to stick onto the snowman’s head. Play around with it – you can adjust the angle or play with the shape/size of the hat, go for it!
Step 16: Leave your lovely snowmen on a dusted surface/baking paper to dry overnight.
 Step 17: Just before serve, ice your delicious cupcakes using a Wilton 18 tip (a small star piping tip would work also). Finally, have fun and dress up your Christmas wonderland cupcakes with the Christmas tree and place your cute snowman just before serving! Tip: You may wish to practice your piping technique on a plate first in order to get the “snow effect” as best as you can.