View All


 View All


 View All


 View All

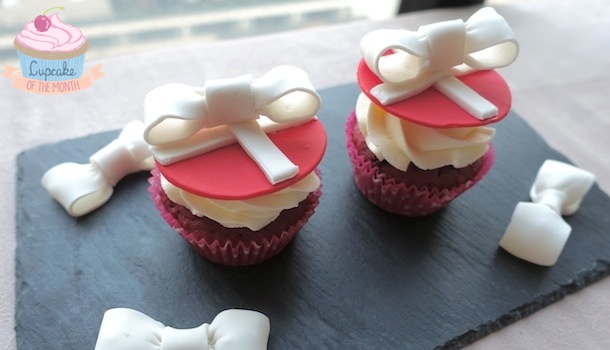
Happy Thanksgiving, mamas! Spruce up your turkey table this year with these delicious red velvet cupcakes. I’ve tried many different recipes over the years and this is the BEST one in my repertoire. I know that you are all busy mamas with lots to prepare for the holidays, but I hope this will be a fun (and tasty) way to break in the baking! They are perfect for impressing your guests at parties, especially with the very easy-to-make, but super impressive fondant ribbon bows for your cupcake toppers!
Kaman’s Cupcakes Signature Red Velvet Cupcakes
Total time: 2 hours
Makes: 12 cupcakes
Ingredients:
- 100g soft unsalted organic butter
- 200g caster sugar
- 1 tbsp red food colouring
- 1 tsp vanilla extract
- 2 large organic free range eggs
- 175ml buttermilk
- 1 tsp organic apple cider vinegar
- 250g organic all purpose flour
- 3 tbsp cocoa powder
- 2 tsp baking powder
- ½ tsp baking soda
Method:
- Preheat the oven to 170°C and prepare your cupcake trays with your favourite festive cupcake cases.
- Combine the cake flour, cocoa powder, baking powder and baking soda in a large bowl and set aside.
- Cream the butter for 1-2 minutes if using an electric mixer. If not, give your biceps a real workout until the butter is softened nicely.
- Add all of the sugar to the butter and mix well until you have a soft, pale fluffy mixture.
- Add in the red food colouring and vanilla extract and mix well.
- Add 1 large spoonful of the dried ingredients, then 1 egg. Give it a really good mix. Then add half of the remaining dried ingredients and the other egg. Give it another really good mix before adding the remainder of the dried ingredients. Mix well at medium-high speed if using an electric mixer.
- Pour the buttermilk and the vinegar into the mix. You need to make sure your cake batter is mixed in well, so that there are no dry ingredients showing and no lumps.
- Divide this colourful festive batter into your cupcake trays (about 2/3 way up).
- Bake in the oven for about 20-25 minutes. Tip: you can use a toothpick to check if they are ready by poking in the middle of the cupcake. They are ready if the toothpick comes out clean.
- Leave them to cool on a wire rack. Do not ice with the frosting until they are absolutely cooled.
Kaman’s Staple Buttercream Frosting
Ingredients:
- 140g organic butter
- 280g icing sugar
- 1-2 tsp of whole milk
- Few drops of your favourite flavour extract e.g. almond or vanilla
- Food colouring of your choice (optional)
Five Simple Steps to Follow:
- Ensure the organic butter is at room temperature. Beat the butter in a large bowl until soft.
- Add half of the icing sugar and beat until combined.
- Add the remaining icing sugar and if required, 1 teaspoon of milk to loosen it up. You can play around with this to reach your desired level of creaminess!
- You can add a few drops of your favourite flavour extract to change it up if you like – be creative!
- Once you are happy with the consistency of your buttercream frosting (nice and fluffy!), add your food colouring. The key is to add small amounts first until you have reached your desired colour intensity.
Thanksgiving Fondant Ribbon Bow Cupcake Topper
I would make these cupcake toppers at least a day ahead, so that the fondant has enough time to dry properly. Otherwise they will go floppy sitting on top of the buttercream frosting!
Feel free to change the colour combination as you wish, but I have gone for a red fondant base with white fondant ribbon bow. These colours really “pop” against the cream-coloured frosting and the festive redness from the cupcakes!
Ingredients:
- Fondant ribbon bows: White gum paste & white fondant. You can always add food colouring to change it up.
- Fondant base disc: Red fondant.
- Tip: Dust your work surface with a small amount of corn flour to avoid your fondant sticking to the work surface.
Step 1: The ratio is 50:50 for gum paste and fondant, so if you need more, just follow this rule of thumb. The gum paste will harden the ribbon bows so that they will keep the shape better. If you are in a hurry, the gum paste will also help to dry the ribbon bows much quicker.
Simply combine by pressing both ingredients together and start stretching and pulling the mixture apart. Repeat this action until well mixed.
If you want to add some colour, dip a toothpick into the food colouring and then smear onto the fondant, continuing to use the stretch and pull technique as above. Remember you can always add more colour so start with a small amount. Tip: If the heat from your hands is making the fondant too sticky, rub some shortening (butter or grease) in your palms first.
Step 2: On a dusted work surface, use a rolling pin to roll out your gum paste/fondant mixture to a thickness of around 2-3mm. Using a ruler, measure and cut out the following ribbon strips:
- 2.5cm width x 14cm length
- 1.5cm width x 14cm length
Step 3: Taking the 2.5cm strip, fold both ends towards the middle, making it as even as possible. When you are happy with the fold, roll up two small balls of kitchen towel / tissue and place them underneath the loops as shown below. This will help maintaining the arch of the loops while the ribbon bow dries. This is the “body” of the ribbon bow.
Step 4: Taking the 1.5cm strip, measure out enough fondant to go over the middle part of the body of the ribbon bow as shown in the picture.

Step 5: Using a small brush (or a clean finger!), dab a small amount of water over the 1.5cm strip to gently glue it down.
Step 6: Fold the remaining part of the 1.5cm strip, you don’t have to worry too much how neat this side of the bow looks, because this will be the underside of the ribbon bow.
Step 7: It’s time to flip the ribbon bow over! This is where the ribbon bow takes its shape. Simply pinch and squeeze gently in the middle of the bow!
Step 8: If you don’t have the fondant tool as shown in the photo here, you can always use the back of a knife or even a cocktail stick to indent the “pinch effect” as shown below. Remember to remove the small balls of kitchen towel / tissue from the ribbon when dried.

Step 9: Moving onto the base of the cupcake topper! On a dusted work surface, use a rolling pin roll out the red fondant, again, around 2-3mm thick. Use a 7cm diameter circular cutter to cut out the base.
Cut out two strips of the white gum paste / fondant mix around 1cm width. Lay them in a crisscross pattern across the red fondant disc and dab a small amount of water to glue them down as shown in the picture below.
Step 10: When both the ribbon bow and the red fondant disc are dried and have hardened, dab a little bit of water in the centre and place the ribbon bow on top. You can play around with it and adjust the angle to give it a more natural effect.
Step 11: Using a Wilton 1M tip, pipe a generous helping of frosting on top of your festive Red Velvet cupcakes. Finally, place your impressive fondant ribbon bow cupcake topper just before serving!