View All


 View All

 View All

 View All
 View All


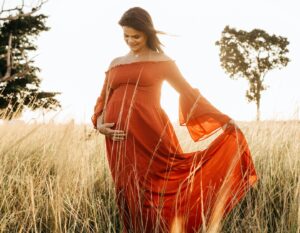
Welcome to the “honeymoon trimester”.
Do you finally have a bit more spring in your step? As those early pregnancy symptoms begin to subside, you may feel more energised. While your belly isn’t uncomfortably huge it is the perfect time to build your strength and stamina. Now is the time to get in some sun salutations, standing poses and gentle backbends. As the uterus grows, some mums may find their posture changing and we want to pay extra attention to postural alignment so as to minimise imbalances and back pain.
It’s also a good time to practise poses that encourage creating space for baby in the uterus and promote optimal foetal positioning (essentially poses that will eventually help baby get into the best position for labour). Keep in mind that as the baby gets bigger, you may find it uncomfortable to lie flat on your back and may need to modify these poses by elevating the upper body or rolling onto the left side body.
Editor’s note: This article contains information and instruction about Yoga and Health. The information contained herein is intended for educational purposes only, and should not be substituted for medical advice from a doctor or healthcare provider. You must consult your doctor or healthcare provider before embarking on this or any other exercise programme. Special cautions may apply to individuals with specific health issues therefore you should consult your doctor or healthcare provider to find out if special restrictions apply to you. Not all exercises are suitable for everyone and this or any exercise programme may result in injury. To reduce the risk of injury, never force or strain during exercise. If you experience pain, discomfort or feel light-headed during exercises, stop immediately and consult your doctor or healthcare provider.
Read more: 7 Prenatal Yoga Poses For The First Trimester
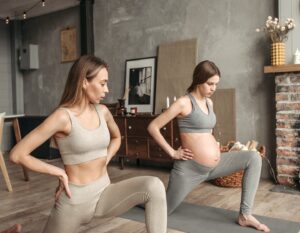
Prenatal Yoga And Your Second Trimester
Remember, you are creating a beautiful life inside of you and that takes priority over achieving the “perfect” yoga pose! My job as a yoga teacher is to provide the tools (i.e. the poses) to help you feel better physically and emotionally, but it’s your job to tune in to yourself and never push yourself to do something that doesn’t feel right. As you practise, be sure not to strain or hold your breath. Let the breath flow easily and naturally to ensure there is enough oxygen supply to yourself and your baby!
To practise these prenatal yoga poses, you will need:
- A yoga mat or a non-slippery surface
- One or two yoga blocks. If you don’t any blocks on hand, you may substitute with a firm pillow (for sitting on), a thick book or anything stable (for placing the hands on/supporting or elevating the body), rolled up towels (for supporting the knees)
- A yoga bolster. You may not need this, but if you find that you need the support and don’t have a bolster, use some cushions and tightly rolled-up towels/blankets to substitute
- A yoga strap. This can be easily substituted with a belt or long towel
Pregnancy is a time to respect and honour your amazing body. Allow your own intuition to guide you and inform you about what to do in your yoga practice, the same way you would let it guide you in making informed decisions throughout your pregnancy and birthing process.
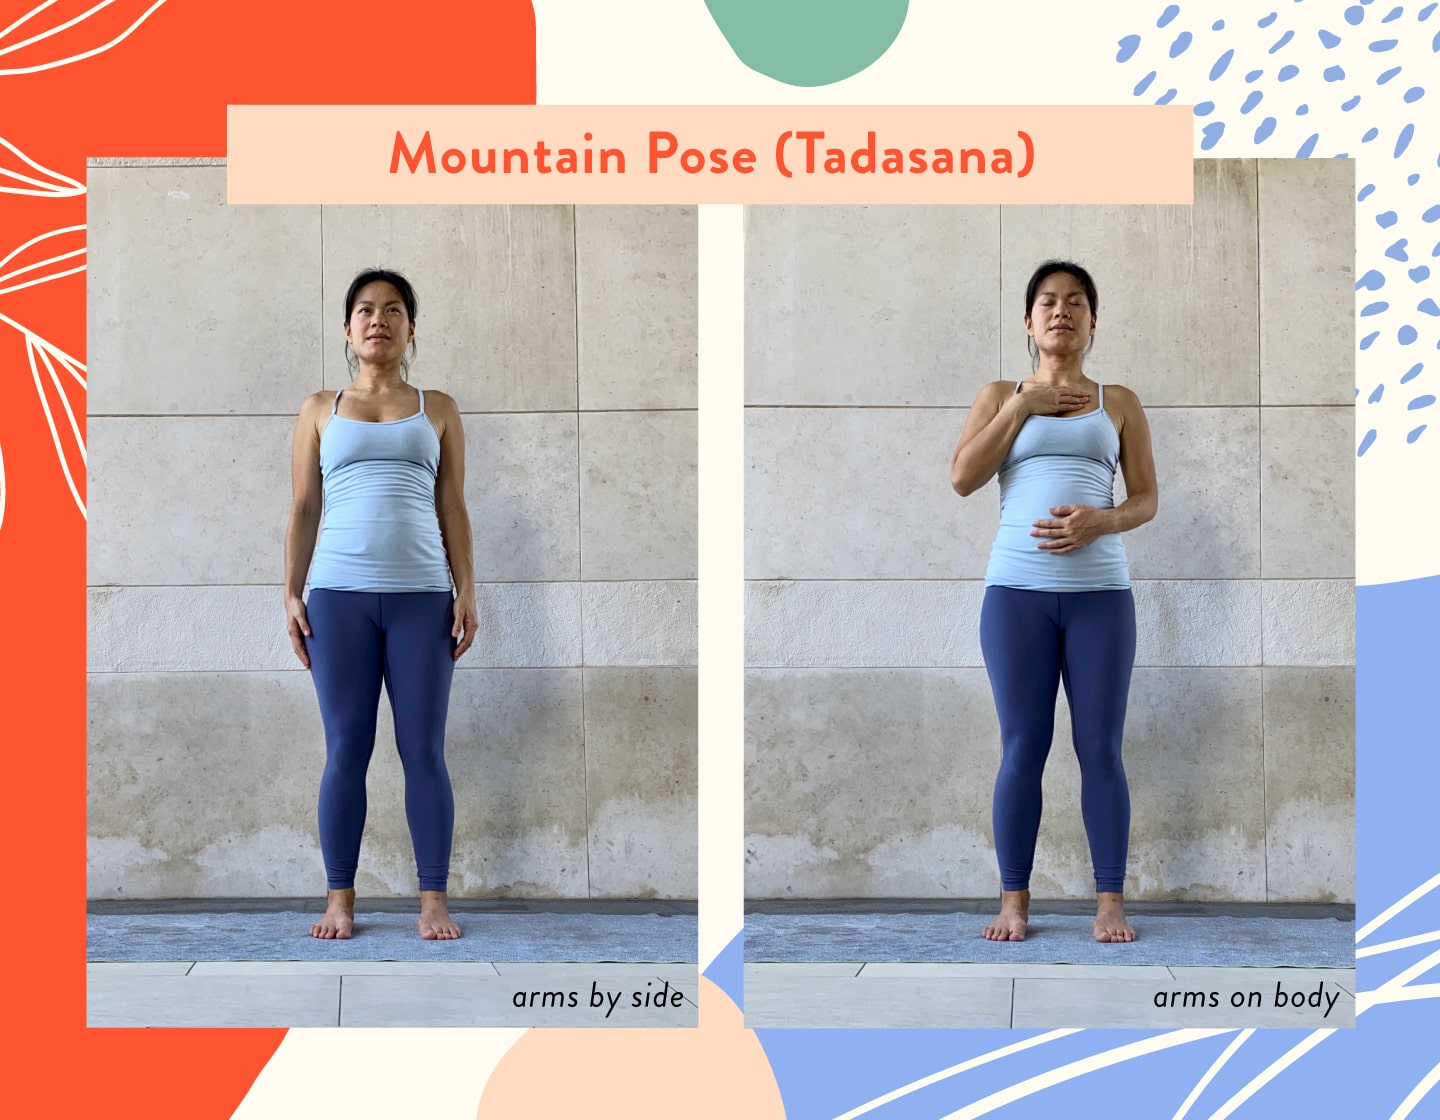
Mountain Pose (Tadasana)
This is the basic pose and starting position for other standing poses and sun salutation sequences. This is ideal for expecting mums to observe their spinal and pelvic alignment.
When practised properly, it strengthens the core, glutes, thighs, knees and ankles. Finding good spinal and pelvic alignment leads to better balance in the uterine ligament and more length in the pelvic floor muscles.
How To Do Mountain Pose:
- Stand with the feet hip width distance apart (or wider if more comfortable), distributing your weight evenly across both feet and among the toes, balls of the feet and heels. As you ground down through the feet, draw the thighs and kneecaps up.
- Gently knit the front ribs in and lengthen the tailbone down towards the ground. You do not want to be overarching the back (which can be common when the belly gets heavier), nor do you want to tuck the tailbone under or jut the pelvis forward.
- Relax the shoulders away from the ears and allow the arms to hang alongside the body. You may choose to place one hand over the belly, the other over the heart centre, connecting heart to womb as you breathe.
- Breathe and hold the pose for 5 to 10 breaths.
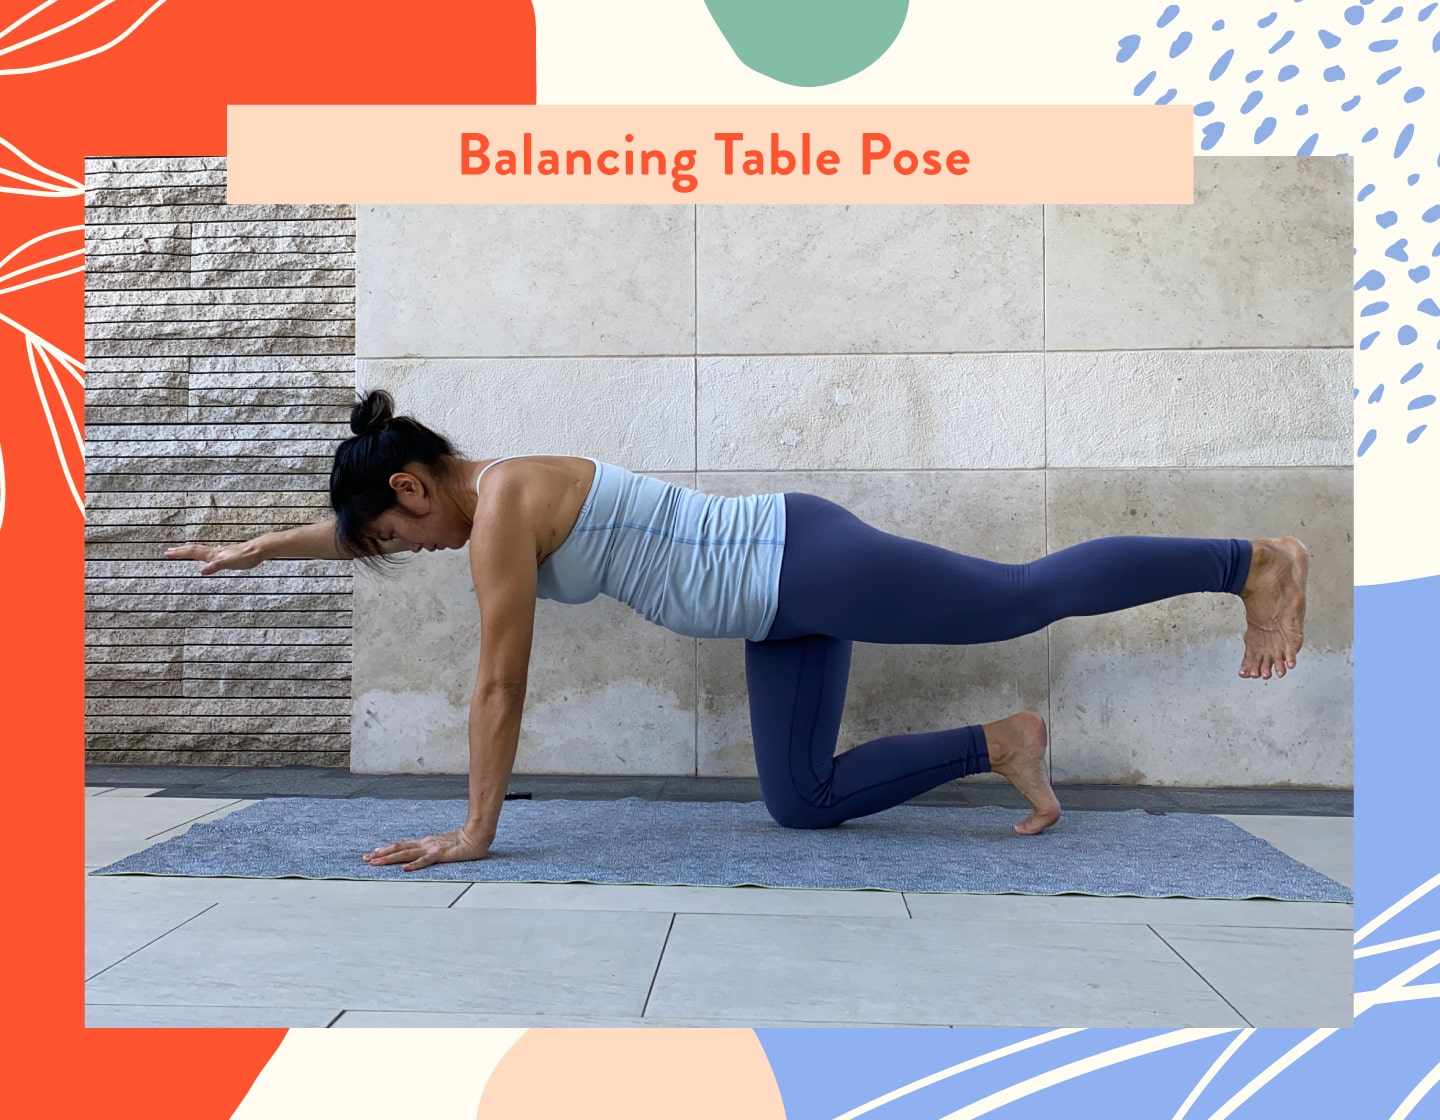
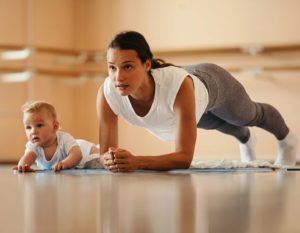
Balancing Table Pose
This pose helps you improve balance, coordination and focus. It aims to strengthen the core muscles which helps support the growing weight of your baby during pregnancy.
If you have sore wrists, lower your forearms onto blocks or curl your hands into fists and press the fists down on the mat. Similarly, if your knees hurt, cushion them by sliding a rolled up towel underneath.
How To Do Balancing Table Pose:
- Starting on all fours, inhale, reach your right arm forward so it is parallel to the floor. Extend the left leg back and lift the leg up, keeping both hips level — if you find it hard to balance or do not feel like lifting the leg up, you can keep your toes on the floor.
- Knit the front ribs in and lengthen the tailbone towards the back heel.
- Breathe and stay for 3 to 5 breaths.
- Exhale, lower the hand and knee down to the mat.
- Repeat on the other side.
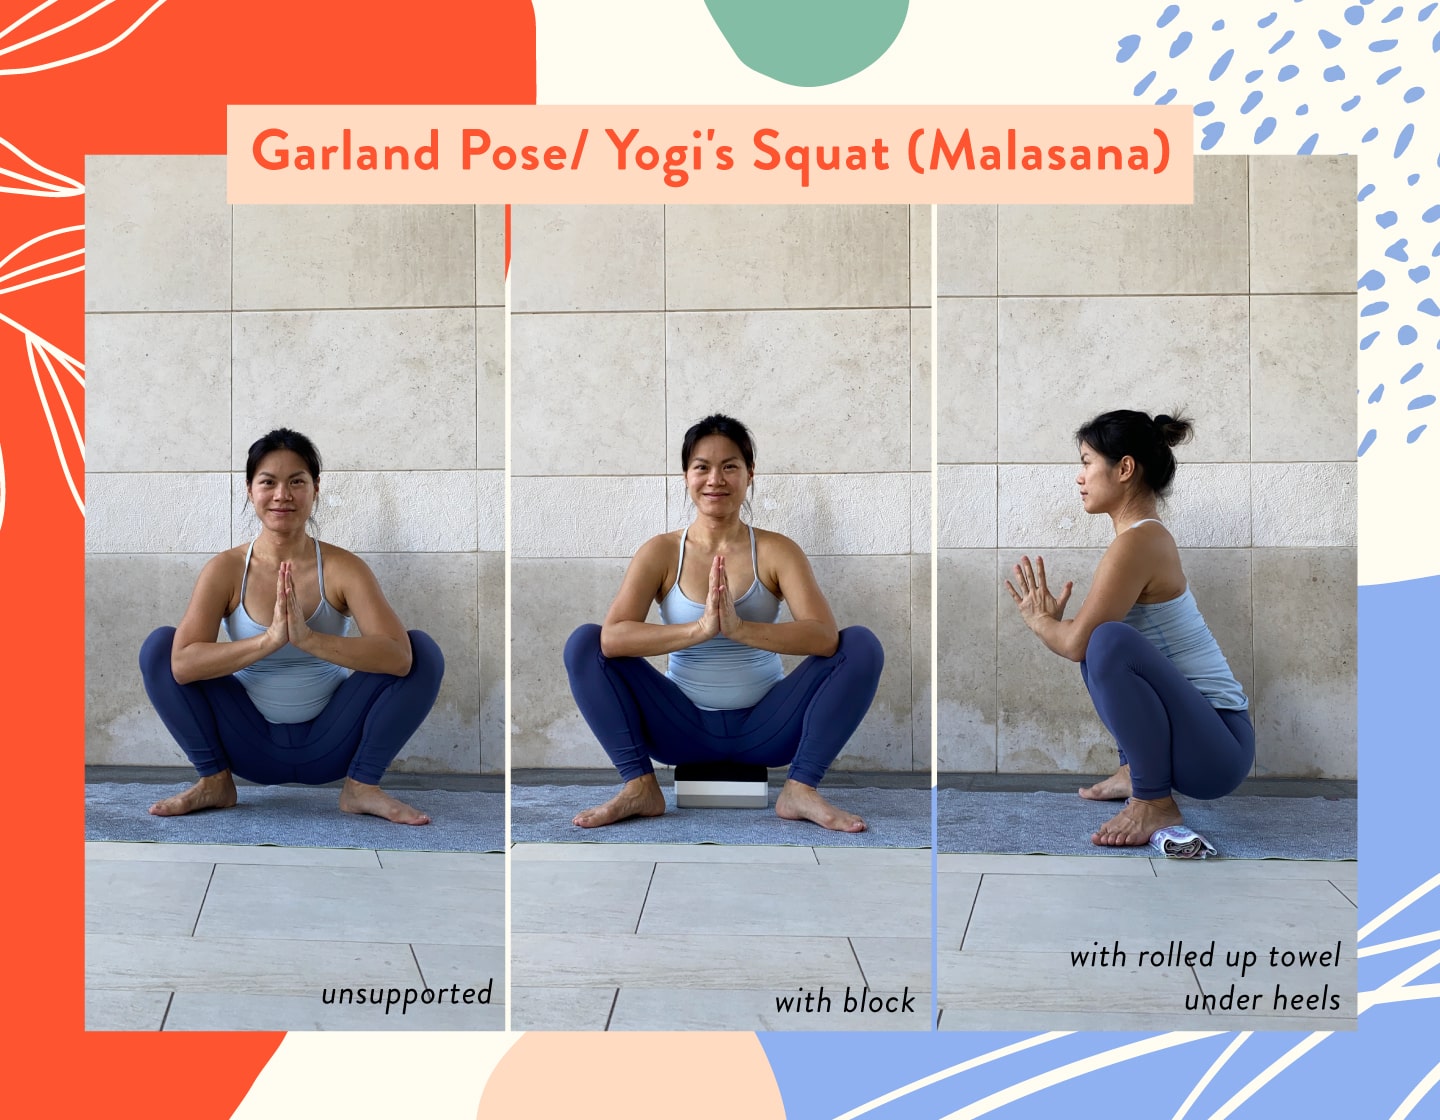
Garland Pose/Yogi’s Squat (Malasana)
Garland Pose is a deep squat that works to open your hips, stretch the hamstrings, back and ankles and increase circulation to the legs. It is especially helpful for those people who spend large amounts of time sitting throughout the day.
This pose promotes lengthening of the pelvic floor and is the perfect pose to stay in while bringing our awareness to the pelvic floor muscles (which play an important role during labour!). It’s also the ideal birth preparation pose as squatting is the most efficient position for birth. It opens the pelvic outlet to its maximum and makes optimal use of gravity so the baby can descend smoothly down the birth canal.
In early or late pregnancy — first trimester mums and those over 35 weeks pregnant — take a supported squat by sliding a bolster or block under the hips. If your heels don’t touch the mat or if you feel discomfort in the ankles, you can roll up a small towel and place it under the heel of each foot.
Don’t force your body into this position. Take it easy, hold on to your partner or something solid for support as you sink down into a half squat. Stay with this until your body is ready for something deeper. You can also squat against a wall for a little more support and to build up strength and flexibility.
How To Do Garland Pose:
- From standing with feet hip width distance apart, take a breath in. As you breathe out, turn your feet out and slowly bend your knees and sink down into a squat.
- Support the pose with props if required.
- Bring your elbows or arms to the inside of the knees and gently press the thighs out. If available to you, bring the hands together in a prayer pose. If you need more help balancing, keep your hands on the mat or your support structure.
- Breathe and stay for 3 to 5 breaths. Notice if you feel the natural movements of the pelvic floor as you breathe in and out. Allow the pelvic floor to release.
- To come out of the pose, bring your hands down to blocks or the mat, slowly unbend the knees and rise up to stand.
Read more: Pre And Postnatal Fitness: Safe Exercise For The First Trimester
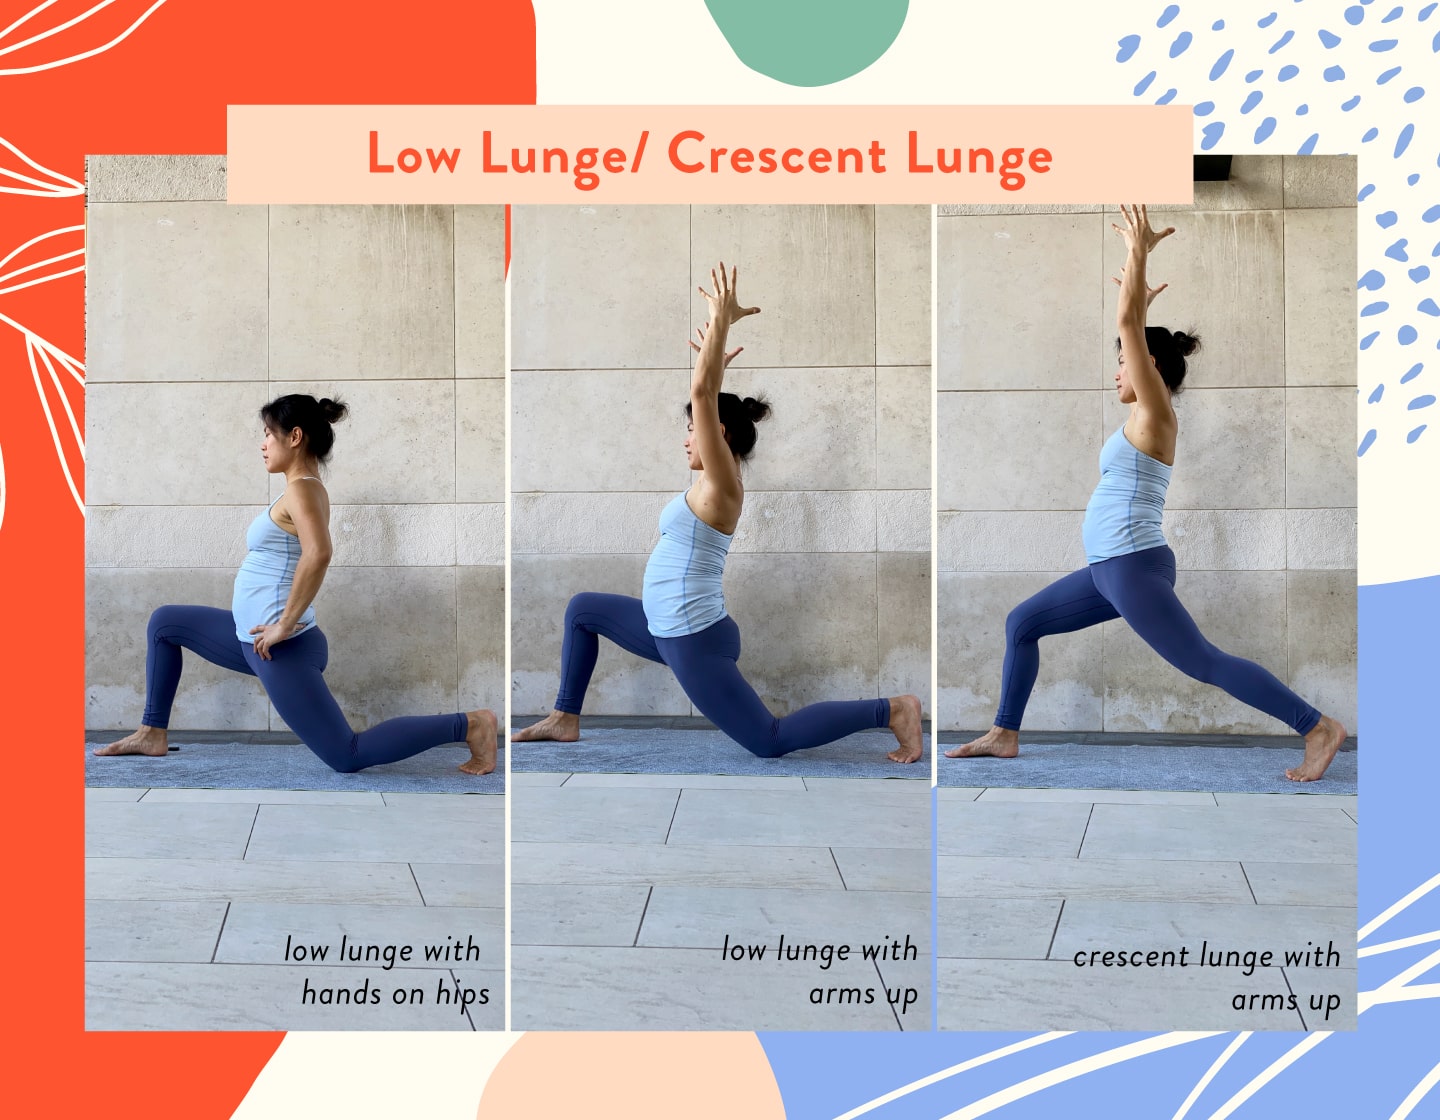
Low Lunge/Crescent Lunge
Lunges help you lengthen tight hip flexor muscles, particularly the psoas. Having long, supple psoas muscles lead to a better range of motion, more optimal foetal positioning and better foetal descent (read: a smoother birth!). This pose also stretches the quadriceps, groin, the front of the torso and opens up the shoulders and chest all while strengthening the glutes and the hamstrings.
If you’re feeling more energised, feel free to lift the back knee up into Crescent Lunge.
You may choose to tuck the toes of the back foot or have the toes untucked so you’re pressing the top of the foot onto the mat. Either option is fine — find one that feels best for you.
How To Do Low Lunge/Crescent Lunge:
- From all fours, step your right foot forward either in between the hands or to the outside of your right hand (to create more space for the bump), shifting your weight forward so the right knee is on top of the right ankle.
- Lengthen the tailbone down towards the mat, but avoid over tucking the tailbone.
- Your hands may rest on your hips or front thigh, or you can extend your arms overhead. Relax the inner shoulders if you raise your arms up.
- If you choose to take Crescent Lunge, tuck the back toes under and lift the left knee off the mat.
- Breathe and stay for 3 to 5 breaths.
- To exit the pose, bring the right knee back to the starting all fours position. Repeat on the other side.
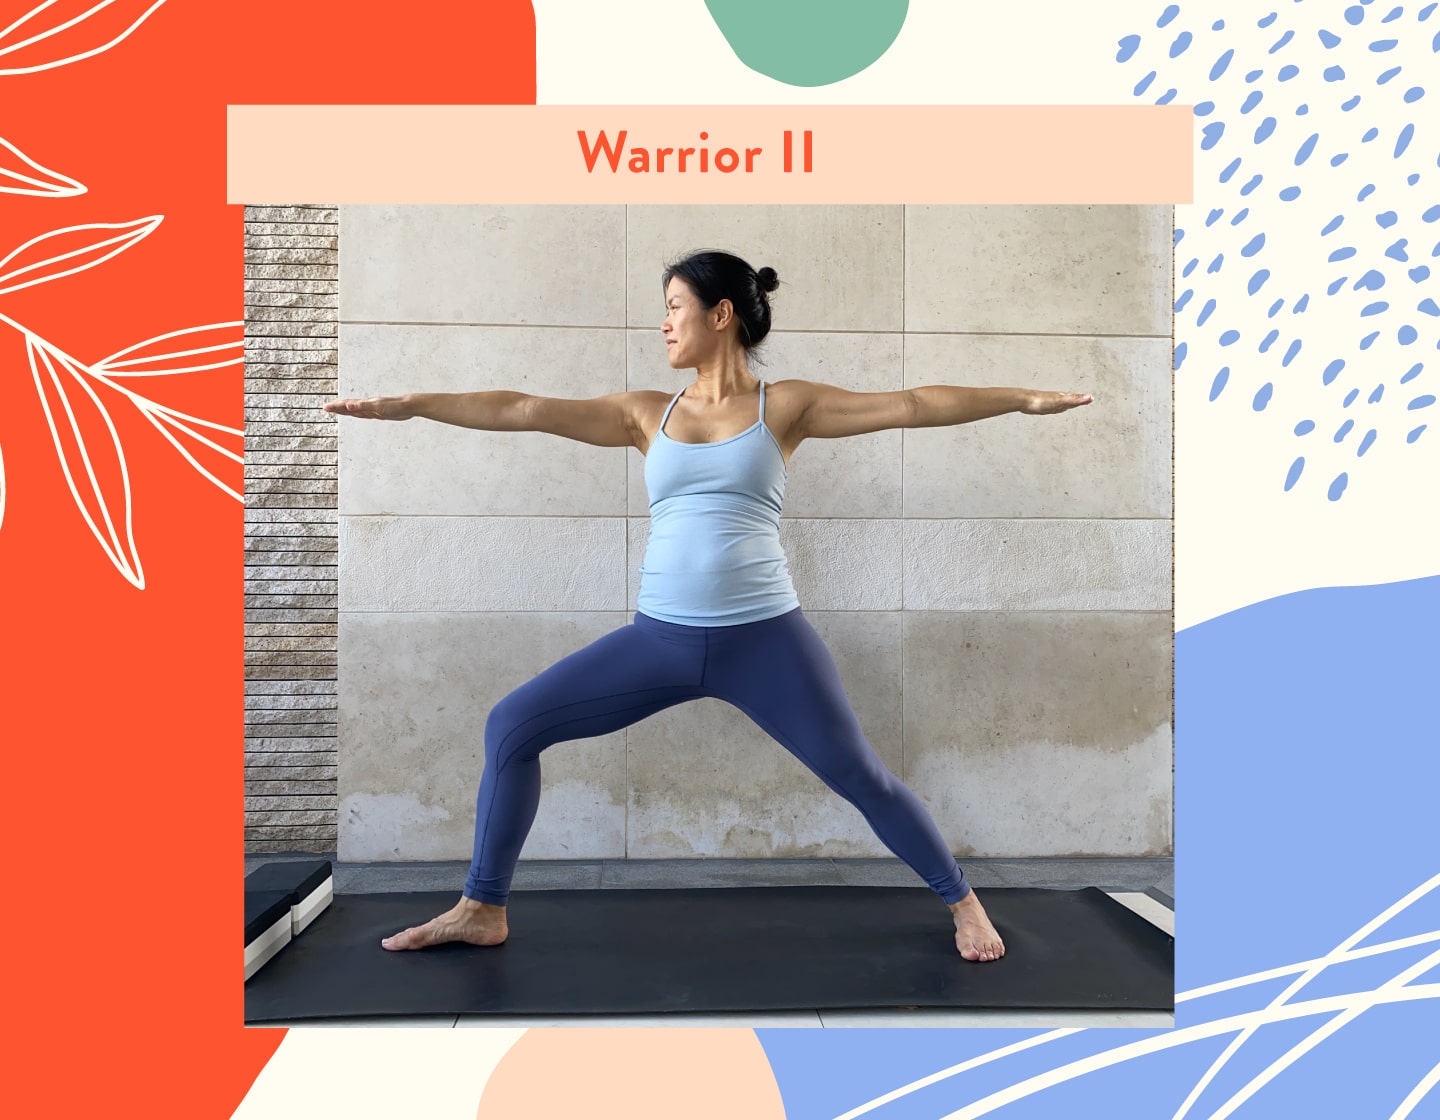
Warrior II
This pose develops strong muscles in the legs and opens up the inner thighs. You’ll appreciate this for active labour!
While stepping the feet wide apart, some people may experience discomfort in the pelvic region — this may be due to symphysis pubis dysfunction, which happens when the ligaments keeping the pelvis aligned become lax from the higher levels of relaxin hormone. If this is the case for you, try having the feet closer to each other and not sinking the hips down as low. Be sure to transition in and out of the pose slowly.
If you’re feeling low on energy or would prefer a supported version of this pose, place a chair under the front leg
How To do Warrior II:
- From standing/Mountain Pose, inhale, step the feet wide apart and take the arms out to the side. Turn the right foot out to the right and turn the left foot in slightly.
- Exhale, bend the right knee and sink the right thigh down to a comfortable level. Open up the right inner thigh so you can see your big toe when you look down. Your right knee should not go past the right ankle.
- Keep the shoulders over the hips. Extend the arms out straight, but keep the shoulders relaxed. Turn your head to the right and gaze beyond your right fingertips.
- Breathe and hold for 3 to 5 breaths.
- Inhale, straighten the right leg, turn the right foot in and relax the arms down. Take a break for a few breaths before repeating on the other side.
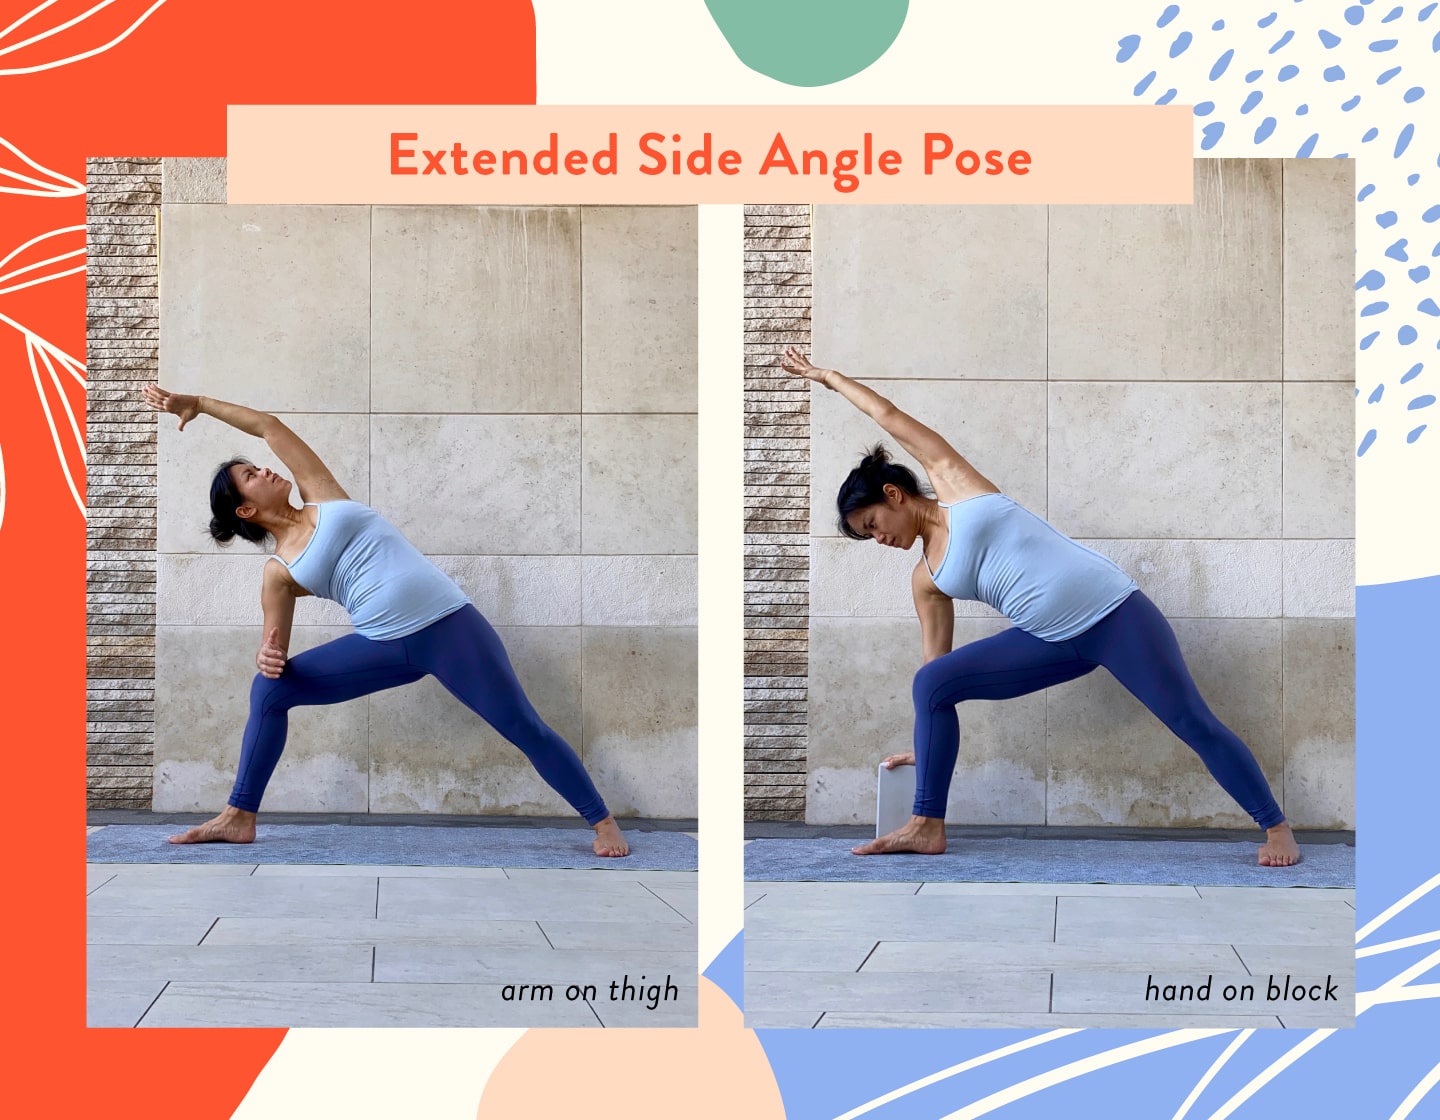
Extended Side Angle Pose
In this pose, you’ll get all the benefits that Warrior II offers, with an added stretch to the abdominal and upper back muscles. It opens up the chest to allow you to breathe fuller and deeper.
The full pose calls for extending the top arm, however, if this overstrains or overstretches the body in any way, just keep reaching up towards the ceiling instead. The bottom arm can stay on the bent leg, or you may want to reach the bottom hand down to a block or the mat.
While in the pose, you can choose to look up towards the left hand, or if that strains the neck, keep the neck neutral by looking forwards or looking down at the right foot and relaxing the neck is also an option.
If you’re experiencing any pelvic girdle discomfort, try taking a narrower and shallower stance by having the feet closer to each other. Transition in and out of the pose slowly.
How To Do Extended Side Angle Pose:
- Inhale in Warrior II (with the right foot turned out and right knee bent), exhale, bring the right forearm down to the right thigh. Raise the left arm up towards the ceiling and lean the left shoulder back slightly to open up the chest. Keep the chest open as you extend the left arm forwards, bringing the bicep close to the left ear.
- If you would like to deepen the pose, bring your right hand down to a block (placed inside/outside the right foot on any height) or down to the mat. Make sure that the chest stays open.
- Stay for 3 to 5 breaths.
- Come up with an inhale, turn the right foot in, lower the arms down, take a break for a few breaths before switching sides.
Read more: Birth Breathing: Techniques For Labour And Delivery Explained
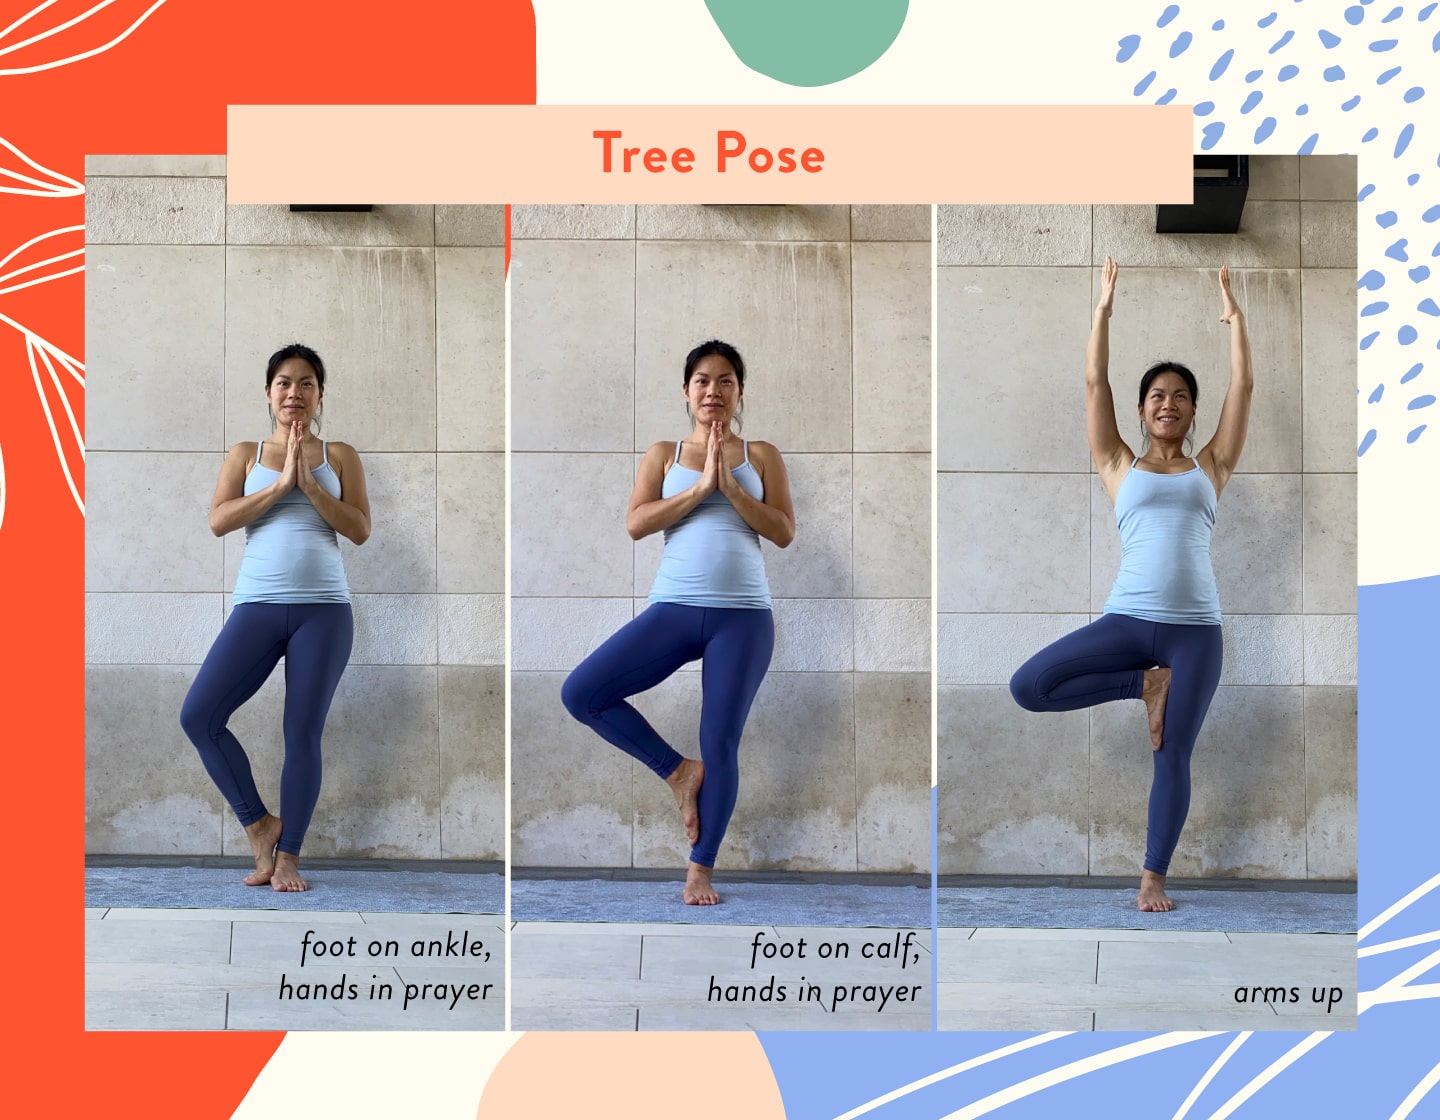
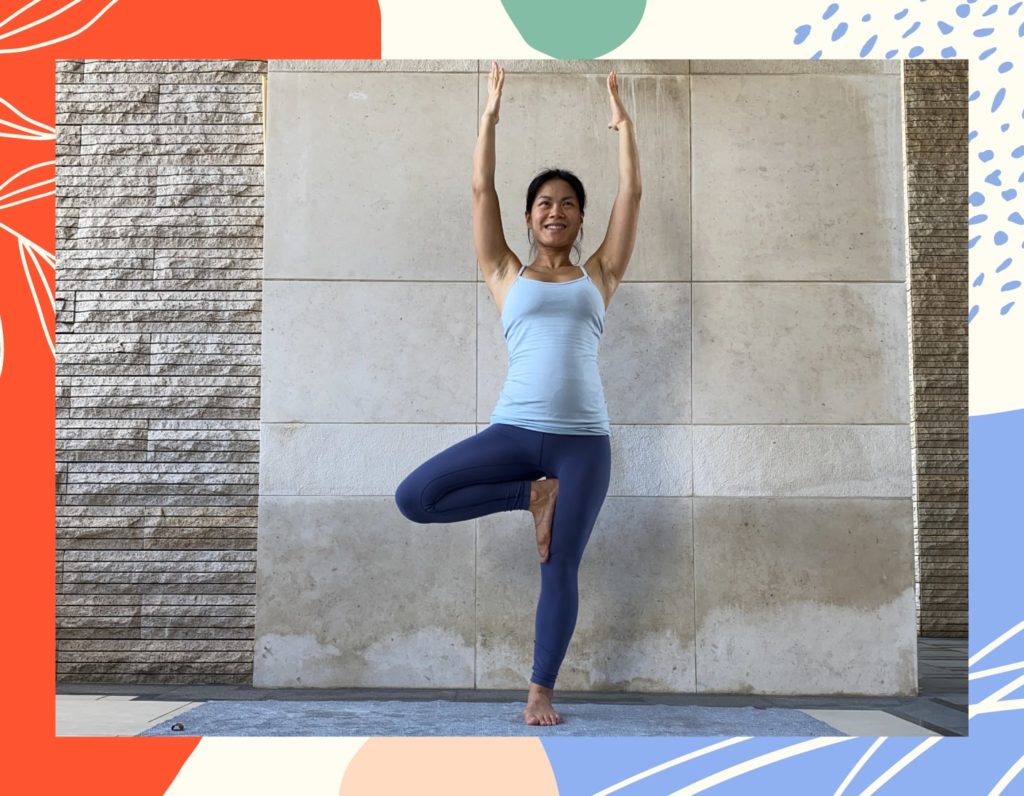
Tree Pose
Use this balance pose for focus and concentration. Tree Pose helps to strengthen muscles in the legs, hips and back. Working on balance is important as your centre of gravity shifts with your growing belly and you’ll develop postural alignment as you find your balance in this pose.
Practise by a wall if you’re not feeling confident about balancing on one leg; alternatively, you can keep the foot of the bent leg lightly grazing the ground. Hands can stay at the wall or at the hips, or folded in prayer pose at the heart centre. If you feel very steady, you can extend your arms upwards towards the ceiling.
How To do Tree Pose:
- Standing in Mountain Pose, shift your weight slightly onto the left foot and bend the right knee. Move the right foot up to the left ankle, calf or inner thigh.
- Lengthen the tailbone down towards the ground and gently knit the front ribs in as you balance.
- Place your hands on your hips, then if you would like to, bring the hands in front of the chest with the palms together. Lastly, if you feel balanced, reach your arms upwards towards the ceiling.
- Gaze softly at a fixed point in front of you. Let the breath flow freely as you hold the pose for 3 to 5 breaths.
- Release the right foot down and repeat on the other leg.
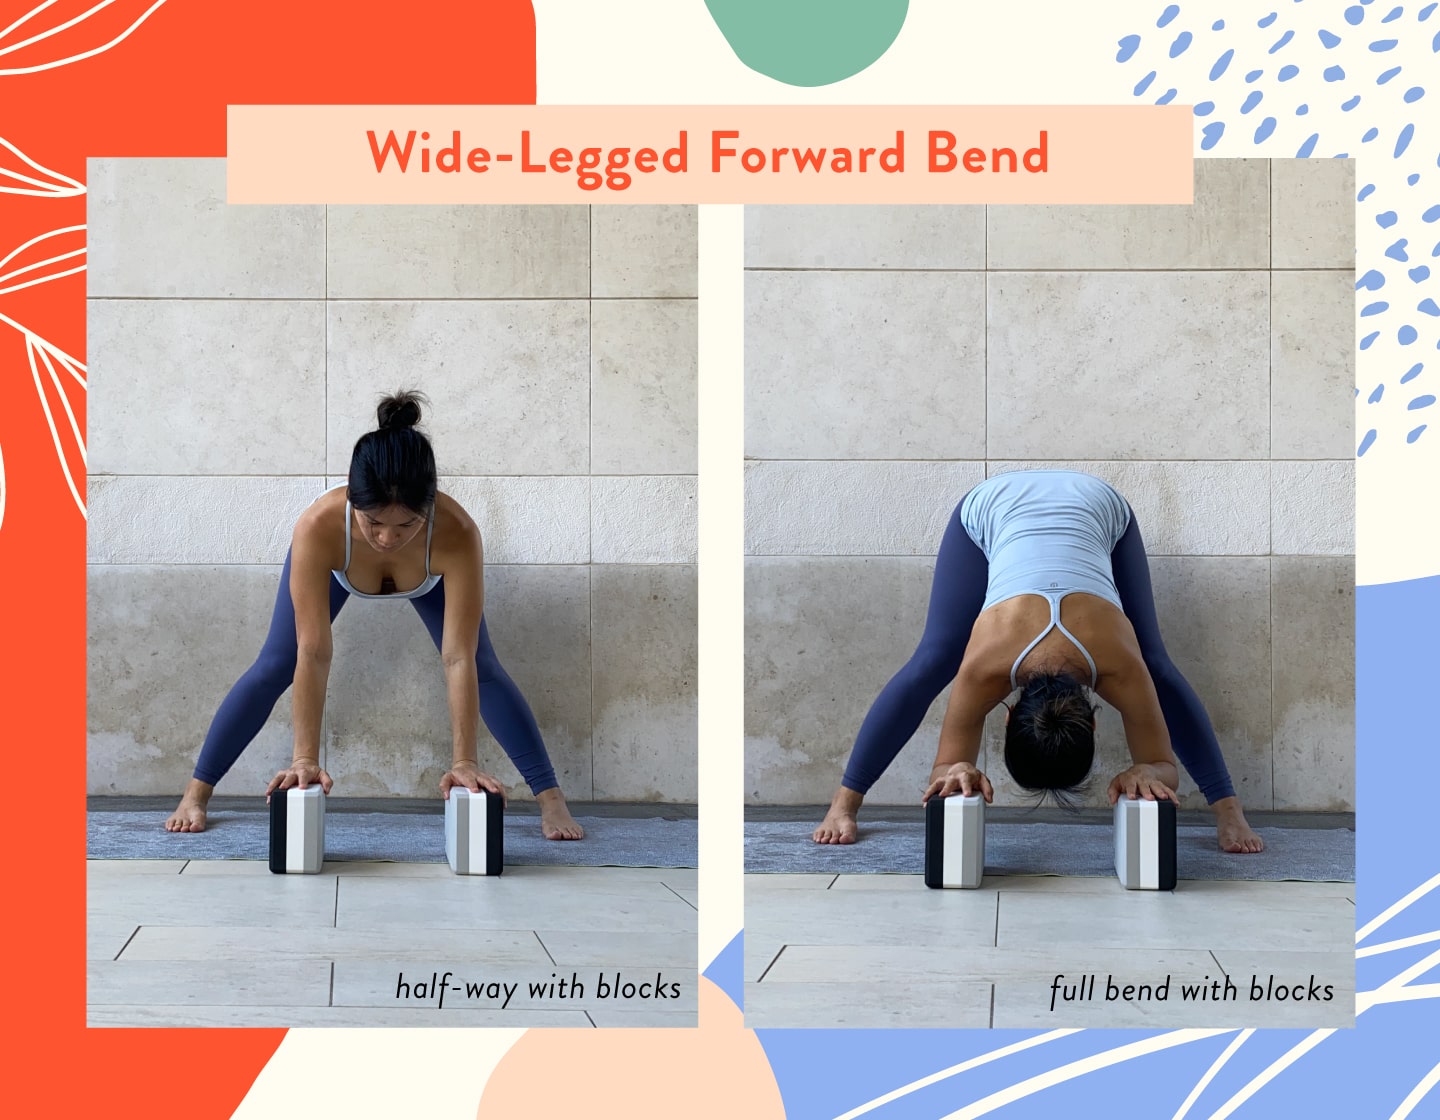
Wide-Legged Forward Bend With Windmills
This one is for those looking to strengthen and stretche the inner and back legs as well as the spine. Adding gentle twists (windmills) helps create more balance in the body and relieves back and hip discomforts.
How much you fold forward depends on how flexible you are and how much space you have (i.e. how big the bump is!). Sometimes bending forwards too deeply can cause discomforts such as dizziness, nausea and shortness of breath — be careful and if you aren’t feeling comfortable, keep the torso lifted so it is parallel to the mat. You could also rest your hands on a chair in front of you, on blocks or on the mat.
As you move into windmills, you want your back to be straight, parallel to the mat.
How To Do Wide-legged Forward Bend:
- Stand with your legs apart and turn the insides of the feet to face each other. Slightly engage the leg muscles by pressing down through the outer edges of the feet and drawing the inner thighs up. Inhale, lift the chest and lengthen the spine. Exhale, fold forward from the hip joints, pointing your belly down towards the mat.
- Bring your hands to a chair in front of you, onto blocks or onto the mat, depending on how far down you want to go.
- Keep the spine long, avoid rounding the back and reducing space for the baby. Think of your belly as a nice comfortable hammock for little bubba.
- Take 3 to 5 breaths in this pose.
- To exit the pose, inhale, softly bend the knees, press down through the feet and use your hands to support yourself up to stand.
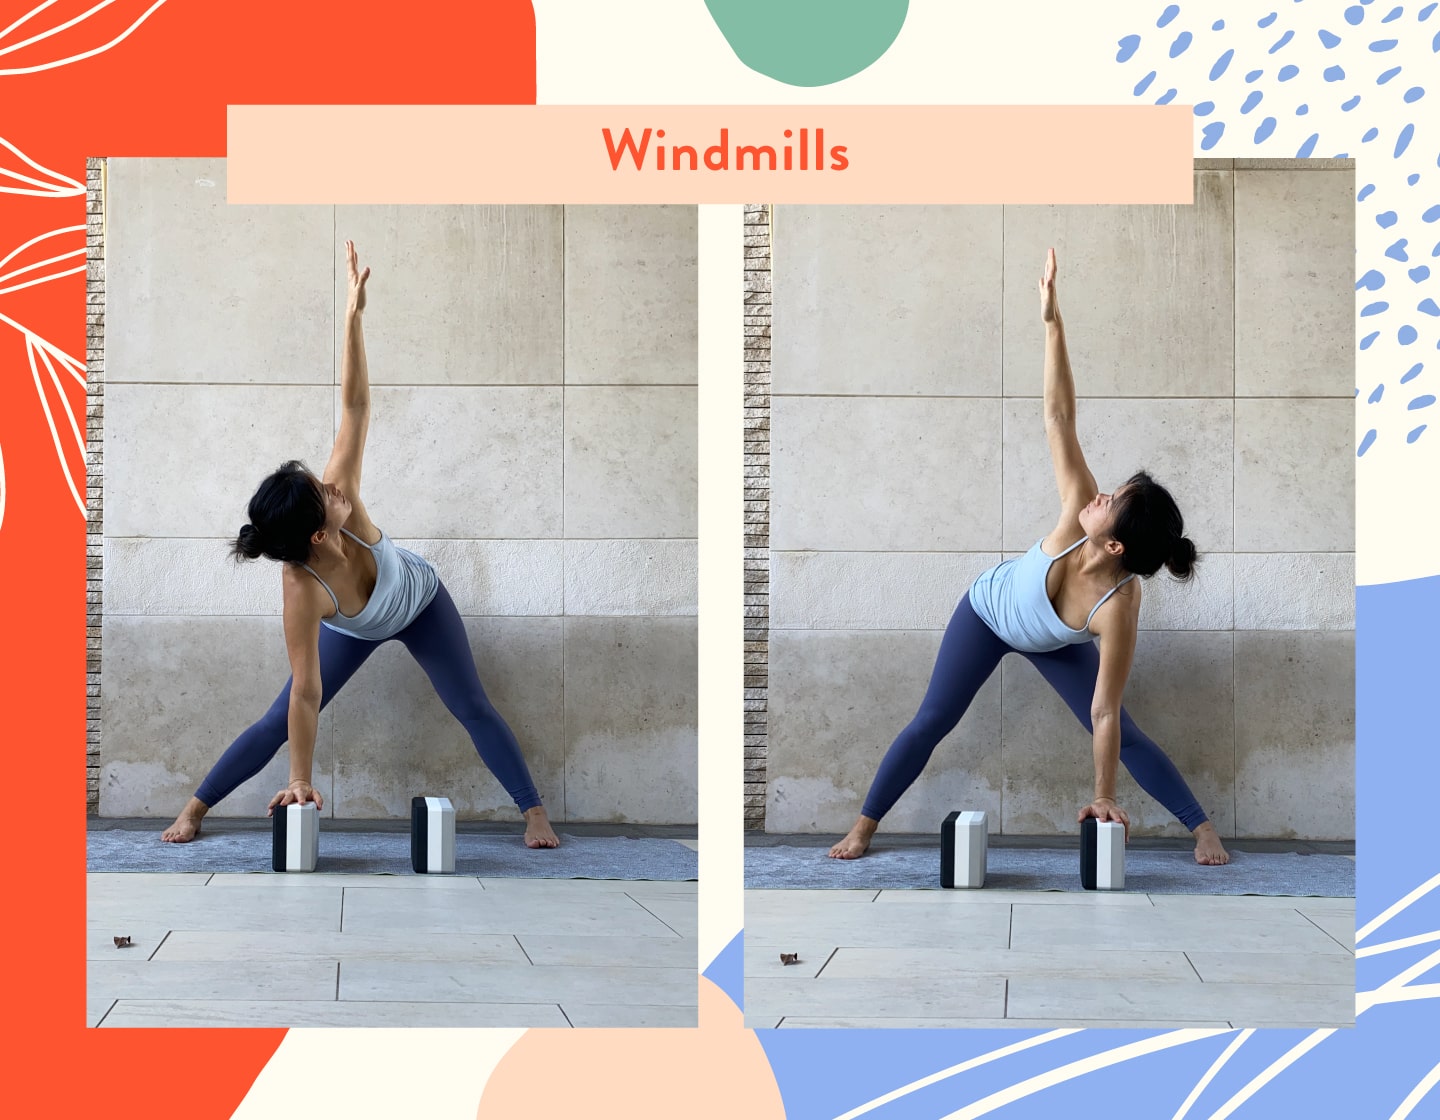
How To do Windmills:
- From your Wide-legged Forward Bend, bring your torso up halfway so your back is parallel to the ground. Place your hands on blocks if necessary.
- Inhale, lift your right hand out to the side and up over your head. Follow your hand with your gaze. Exhale, lower your right hand down to the block/mat.
- Inhale, lift your left hand out to the side and up over your head. Follow your hand with your gaze. Exhale, lower your left hand down to the block/mat.
- Do 5 to 10 repetitions on each side, synchronising the movement with your breath.
- When finished, inhale, softly bend the knees, press down through the feet and use your hands to support yourself up to stand.
Read more: Your Ultimate Guide To Postnatal Recovery In Hong Kong