

New recipes for you or your helper to try out!
Living in Hong Kong, many people are in the fortunate position of being able to employ helpers to assist around the house. Apart from looking after the kids and keeping the apartment spick and span, you might ask them to help prepare a home-cooked meal for you at the end of the day. While most domestic workers speak English very well, there are some things that can get lost in translation (e.g. mistaking”baking powder” for “bacon” ended up with hilarious results in my household)! So here are some crowd-pleasing recipes from the cookbook that needs no introduction, A Helping Hand: Delicious Recipes in English and Tagalog. Published three years ago by Singapore-based expat Frog Michaels in both English and Tagalog to give you and your helper some inspiration in the kitchen.
A Helping Hand not only allows your helper to shop for all the ingredients easily, thanks to its picture glossary for tricky ingredients in the back of the book (saving you from going out), but with its classic recipes comprehensively explained in Filipino, it consistently allows for a pretty perfect delivery too.
Read more: Sassy Mama’s Midweek Meals: Budget-Friendly Recipes
There is a lot of fuss about how to poach an egg. Some people swear that their success rates double by adding vinegar to the water and swirling it into a vortex, but I always find (rather unsurprisingly) that that just makes my eggs taste of vinegar.
Here is one sure-fire way to guarantee a perfectly poached egg. Yes, you read that right. This technique is apparently a not-so-secret chef’s tip that I was thrilled to stumble upon quite by chance a few years ago. The good news is that it’s foolproof and is used in restaurant kitchens across the world when they have to poach large batches of eggs in one go.
Method:
- Tear off a section of cling film and push it into a ramekin to line it.
- Pour the tiniest bit of oil onto the cling film and rub it around, before cracking the egg into the well in the cling film.
- Draw up the sides of the cling film and tie a knot in the end, as near to the egg as you can. Failing that, just twist it closed tightly. Repeat for each egg.
- Pop each cling-wrapped egg straight into a pan half full of water that is not boiling but has a trace of tiny, simmering bubbles on the base of the saucepan.
- Cook for 3 to 5 minutes (depending on your preference) keeping the heat constant, before removing them from the pan, cutting off the knot with some scissors and discarding the cling film. Slide onto a plate and serve at once.
Paraan:
- Gumupit ng isang piraso ng cling wrap na kasing laki ng malaking plato. Ipatong ito sa ibabaw ng maliit na mangkok o ramekin.
- Pahiran ng kaunting mantika ang isang bahagi ng cling wrap. Hindi kinakailangang gamitin lahat ng mantika.
- Basagin ang itlog sa gilid ng mangkok at saluhin ito ng mangkok na may cling wrap. Ibuhol at itali ang lahat ng dulo ng cling wrap na hindi nag-iiwan ng puwang sa loob ng ginawang supot. Ang mangkok ay gamit lamang upang saluhin ang itlog at maibuhol ang cling wrap. Hindi ito isasama sa pagluluto. Ulitin ang proseso para sa bawat itlog.
- Magpainit ng tubig sa kaserola. Bago pa ito kumulo, ilagay dito ang isinupot na itlog (dapat nasa mahinang apoy lamang). Malalaman kung kailan ang tamang oras nito kapag nakita nang may mga bulang namumuo sa ilalaim ng tubig. Lutuin ang itlog nang mga 3-5 minuto.
- Iahon ang itlog. Gupitin ang pagkakabuhol ng cling wrap at saluhin ng plato ang poached egg. Ihain agad.
Tips:
- Simmer your cling-wrapped eggs – do not boil them. Remove them carefully from the water with a slotted spoon.
- When you are bagging up your egg in cling film, try throwing in some herbs for flavour, a splash of truffle oil or, my favourite, a small knob of butter.
Mga rekomendasyon:
- Lutuin lamang sa mahinang apoy ang itlog at huwag sa kumukulong tubig. Ahunin mula sa tubig ang itlog gamit ang sandok na may mga butas (slotted spoon).
- Maaaring budburan ang itlog ng herbs o patak ng mantika na truffle o kaunting mantikilya bago ibuhol at itali ang cling wrap. Makakadagdag ito sa lasa.
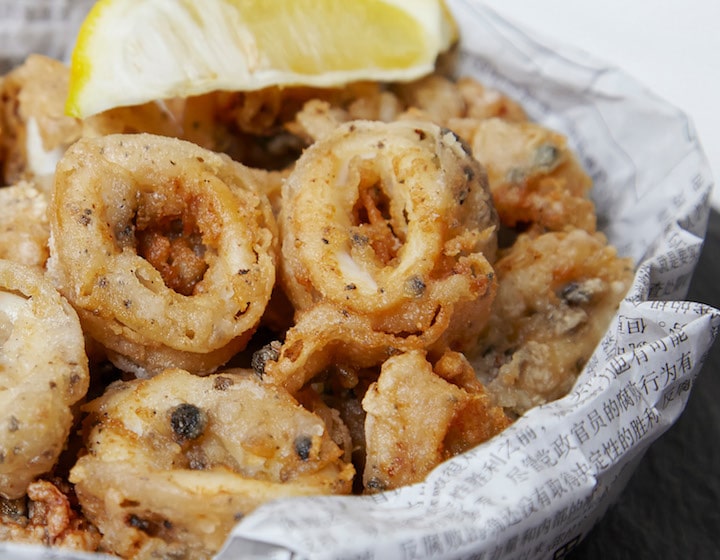
This makes a delicious starter and, as it’s best eaten with your fingers, people don’t even need to be sitting down at the table to enjoy it! I like to serve this alongside a small pot of shop-bought mayo, enlivened with a good squeeze of lime, salt and pepper and a dash of paprika.
Ingredients:
500g squid, including any tentacles
¾ tbsp black peppercorns
1 tbsp salt flakes
100ml sunflower oil
3 tbsp plain flour
4 tbsp cornflour
500g pusit kasama ang mga galamay
¾ kutsarang buo na paminta
1 kutsarang salt flakes
100ml mantika na sunflower
3 kutsarang harina (plain flour)
4 kutsarang cornflour
Method:
- Ask your fishmonger to clean the squid and remove the inner beak. Cut the flesh into rings (about 1 to 1.5cm wide) and/or triangular pieces, leaving any tentacles whole (unless they’re ridiculously long!).
- Place the whole peppercorns in a dry frying pan over a high heat and toast them for 1 to 2 minutes. Transfer to a pestle and mortar and crack and grind them into a lumpy black powder. There is no need to pulverise them into dust, but equally, you don’t want enormous uncracked lumps either. Add the salt and mix well.
- Pour the oil into a frying pan and heat. You need the pan to be half full of oil (so add more or less than the stated amount depending on the size of your pan).
- In a ziplock bag, shake up the flour, cornflour, salt and pepper. Toss the squid inside and shake it again.
- Test the temperature of the oil with a small piece of bread. It should float to the top and turn golden within 20 seconds. You are now ready to fry the squid, but will need to do so in batches.
- Stand well back as the oil will spatter. Shake off any excess peppery flour from the squid rings back into the bag before adding the pieces of squid to the hot oil. After about 2 minutes, when the batter has turned a light golden colour, turn the rings to cook on the other side (about 1 minute).
- Once each batch is ready, transfer the squid onto a plate covered with a paper towel to absorb any excess oil. When everything has been cooked, arrange the squid rings on a large plate or platter. Serve immediately.
Paraan:
- Kung bibili ng pusit mula sa palengke, ipalinis ang mga pusit at ipatanggal ang tuka na parang plastic na nasa loob nito.
- Hiwain ang pusit nang pabilog na sukat nasa 1cm to 1.5cm, o hiwain sa hugis na tatsulok.
- Tustahin ang paminta sa tuyong kawali sa ibabaw ng malakas na apoy nang mga 1-2 minuto.
- Durugin ang tinustang paminta gamit ang mortar and pestle, pangdikdik o kahit anong pwedeng pangdurog. Hindi kinakailangang maging parang pulbos ang pagkakadikdik. Sapat na ang madurog ang malalaking piraso. Ihalo ang salt flakes dito at haluin nang mabuti.
- Painitin ang kawali na may mantika sa kalan. Dapat ay mangalahati sa kawali ang dami ng mantika, kung kaya’t dagdagan o bawasan ang dami ng mantika kung kinakailangan.
- Pagsamasamahin ang harina, gawgaw, dinurog na paminta at salt flakes sa supot na ziplock. Alugin ang mga laman upang mahalo mabuti.
- Isama sa supot ang hiniwang mga pusit. Alugin muli ang mga laman upang mahalo nang mabuti.
- Para malaman kung mainit na ang mantika at maaari nang gamitin sa pagpiprito, maglagay ng maliit na piraso ng tinapay sa kawaling pinapainit. Kapag lumutang ito matapos ang 20 segundo at maging kulay brown, hudyat ito na maaari nang pagprituhan ang mantika.
- Lumayo sa kawali dahil maaaring tumalsik ang mantika habang nagpiprito. Ipagpag ang mga pusit bago ilagay sa kawali upang matanggal ang sobrang tinimplang harina na nakakapit dito.
- Matapos ang 2 minuto o hanggang maging tustado nang katamtaman ang harinang nakabalot sa mga pusit, baliktarin ang mga ito upang maluto ang kabilang bahagi. Iprito muli nang mga 1 minuto.
- Gamit ang sipit, ipatong ang mga nilutong pusit sa plato na may kitchen tissue upang masipsip ang mantika. Ilipat sa malaking plato na malinis at ihain agad.
Tips:
- Do not crowd the pan with too much squid or the temperature of the oil will drop too much.
Mga rekomendasyon:
- Huwag pagsiksikin ang mga pusit sa kawali upang hindi mag dikit-dikit at mawala agad ang mantika.
Read more: What To Know If You’re Hiring A Helper For The First Time
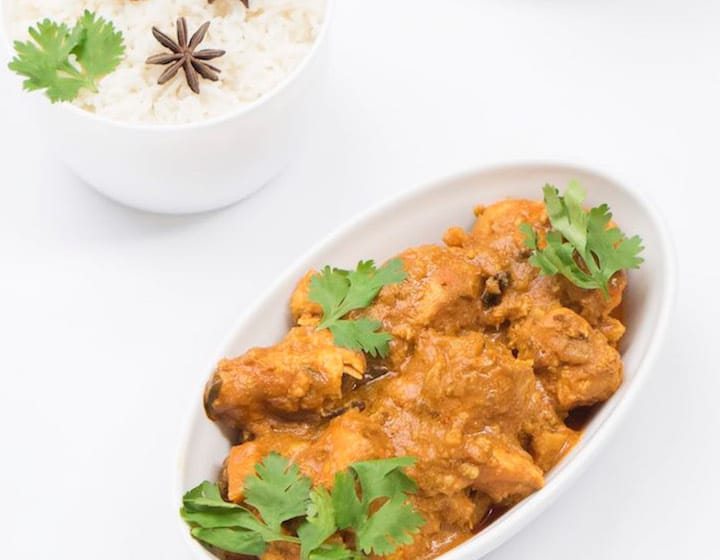
I was taught this recipe by Sriya, a wonderful Sri Lankan lady who is an intuitive, natural cook. My children call her “Aachi”. This is a proper curry that never fails to please.
Ingredients:
900g chicken pieces, preferably on the bone, skin removed (I suggest 2 breasts, 2 drumsticks, 2 thighs)
4 tbsp plain yoghurt
6 garlic cloves, crushed
30g ginger, peeled and smashed
2 tsp ghee
1 tbsp sunflower oil
2 small red onions, chopped (around 140g)
10g curry leaves
1 cinnamon stick
½ tsp cloves
1 tsp cumin seeds
1 tsp chilli powder
3 tsp curry powder
½ tsp freshly ground black pepper (optional)
100ml hot water
¼ tsp salt
900g manok kasama ang buto, tanggalin ang balat (mainam na bumili ng 2 pitso, 2 binti, 2 hita)
30g luya
6 biyak na bawang
4 kutsarang plain yogurt
2 pulang sibuyas
2 kutsaritang ghee
1 kutsarang mantika na sunower (sunflower oil)
10g dahon ng curry (curry leaf)
1 cinnamon stick
½ kutsaritang cloves
1 kutsaritang cumin seeds
1 kutsaritang chilli powder
3 kutsaritang curry powder
½ kutsaritang durog na paminta
100ml mainit na tubig
¼ kutsaritangasin
Method:
- Cut each chicken breast into three pieces. In a big bowl, mix all of the chicken with the yoghurt, garlic and ginger and leave it to marinate in the fridge, covered, for at least one hour.
- Heat the ghee and oil in a large heavy-bottomed pan or casserole dish.
- Fry the onions over medium heat for 2 minutes or until the edges start to brown.
- Turn the heat down and add the curry leaves, cinnamon stick and cloves as well as the cumin seeds, chilli powder and curry powder. Add the ground black pepper now too, if you are using it.
- Stir well before adding the marinated chicken pieces to the pan, including the accompanying smashed ginger and garlic. Fry the chicken in the spices for a few seconds to seal the meat before adding 100ml water.
- Allow the curry to reach boiling point then add salt. Turn the heat down and simmer for 30 minutes or until the chicken is cooked and tender.
- Transfer to a serving bowl. Serve immediately, or alternatively the curry can be reheated and eaten when required.
Paraan:
- Gumamit ng timbangan upang makuha ang tamang dami ng manok, bawang, luya, at sibuyas at panukat para sa tubig.
- Hiwain ng tig-3 piraso ang bawat pitso.
- Balatan at pitpitin ang luya, dikdikin ang bawang gamit ang pangdikdik. Sa isang malaking mangkok, paghalu-haluin ang luya, bawang, plain yogurt, at lahat ng manok. Takpan ng cling wrap at hayaang nakababad nang 1 oras o higit pa at ilagay muna sa ref.
- Balatan at hiwain nang maliit na pakwadrado ang sibuyas.
- Makalipas ang 1oras o kapag handa nang iluto ang manok ay painitin na ang kaldero sa katamtamang apoy sa kalan at ilagay dito ang ghee at mantika.
- Kapag mainit na ang mantika, igisa ang sibuyas nang 2 minuto o hanggang sa magbrown ang gilid nito. Hinaan ang apoy at ilagay na ang dahon ng curry, cinnamon at cloves at saka haluin ang mga ito.
- Sunod na ilagay ang cumin seeds, chilli powder at curry powder. Maaari na ring ihalo ang durog na paminta kung nais ninyong maglagay nito.
- Haluing mabuti ang mga sangkap bago ilagay ang binabad na manok, kasama ang dinurog na luya at bawang na pinagbabaran nito. Igisa sa loob lamang ng ilang segundo (huwag susunugin) bago ilagay ang tubig.
- Pakuluin muna ang niluluto bago ilagay ang asin.
- Hinaan ang apoy at patuloy na pakuluin at lutuin nang 30 minuto. Tingnan- tignan hanggang sa lumambot at maluto ang manok.
- Ihain agad o hayaang lumamig at pwedeng ipainit ulit.
Tip:
- Take the ghee out of the fridge before you need it, otherwise, it will be rock hard and difficult to measure.
Mga rekomendasyon:
- Ilabas ang ghee sa ref nang maaga, bago ito gamitin. Kung hindi ay magiging mahirap ang pagsukat nito dahil matigas pa ito.
Read more: Midweek Meals: Warming Winter Recipes
Featured image courtesy of Getty. All other images courtesy of A Helping Hand.
 View All


 View All


 View All


 View All


