View All


 View All


 View All

 View All


Impressive dishes are easy to make with the KitchenAid Mixer!
In just a few short weeks, the kiddos will be out of school and we’ll be wondering what to do with them! One of the best ways to keep them busy under the guise of having fun (but also helping us out!) is cooking together in the kitchen. And for time-crunched mamas, the best thing we can do is find recipes that are equally nutritious as they are easy to make.
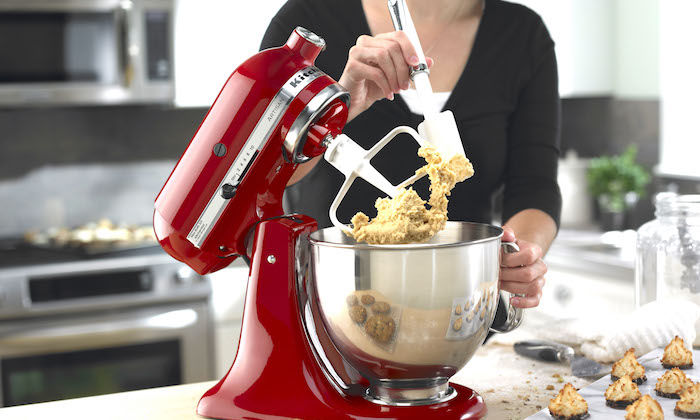
We’re also looking for ways to simplify our life in the kitchen and use fewer cooking tools and gadgets. Thankfully for us, the highly coveted KitchenAid Mixer is really all we need for making healthy meals for the whole gang. We’ve definitely been eyeing the Artisan Series Stand Mixer in Empire Red as this beautiful power hub turns a regular stand mixer into a culinary centre. Say “goodbye” to using multiple machines and hello to the one single thing everyone needs in their kitchen. We’re talking about 12 optional attachments that have you making fresh pasta from scratch, shredding a block of parmesan cheese in seconds or even whipping up your very own customised ice-cream. This mixer is the real deal, ladies!
We’ve picked out three easy-t0-make recipes that will be a sure hit with your entire family. Click through our slideshow to check these impressive dishes made with the KitchenAid Mixer. Trust us, everyone will be blown away by the end result, while you’ll surprise yourself with how easy they are to make!
We’re happy to report that the KitchenAid Artisan Series Stand Mixer is now available at the newly opened J SELECT store at Pacific Place. It’s our one-stop-shop for all our favourite international brands and premium products from around the world. J SELECT stocks everything ranging from smart home appliances to trendy gadgets, cameras, health and beauty equipment to name a few!
The recipe is taken from KitchenAid Cookbook.
Ingredients:
(Makes 20 bites)
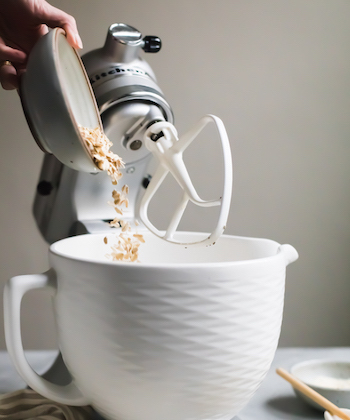
- 1 1/2 cups old-fashioned oats
- 1/2 cup almond meal
- 3 tablespoons almond butter
- 1/2 cup unsweetened shredded coconut, divided
- 1 tablespoon chia seeds
- 1/4 cup + 2 tablespoons honey (or maple syrup)
- 1 tablespoon lemon zest (about 2 large lemons), freshly grated
- 1 tablespoon poppy seeds
Directions:
Add the oats, almond meal, almond butter, 1/4 cup of the unsweetened shredded coconut, chia seeds, honey, lemon zest, and poppy seeds to the KitchenAid® Ceramic Bowl of the KitchenAid® Stand Mixer fitted with the flat beater. Mix on low speed for a few seconds. Increase to medium speed and mix until completely combined, about 2-3 minutes.
Measure heaping tablespoon-sized balls and roll them into tightly packed rounds between your palms. If the dough crumbles rather than sticks together, add another tablespoon of honey and mix until combined.
With the remaining 1/4 cup of unsweetened shredded coconut in a small bowl, roll each ball in the coconut, pressing it firmly into the sides. Enjoy!
The energy bites will keep for up to a week in an airtight container in the refrigerator.
The recipe is taken from KitchenAid Cookbook.
Ingredients:
(Makes 6-8 servings)
For the pasta
- 4 cups all purpose flour, sifted
- 5 eggs
- 1/4 teaspoon Kosher salt
For the Bolognese sauce
- 2 tablespoons extra virgin olive oil
- 2 carrots, peeled and minced
- 2 stalks celery, minced
- 2 cloves garlic, minced
- 8 ounces cremini mushrooms, minced
- 1 onion, minced
- 6 ounces tomato paste
- 1/2 bottle red wine
- 2 pounds ground beef
- 1 pound ground veal
- Water
- Salt and pepper, for seasoning
Directions:
For the pasta
Add flour into the bowl of the KitchenAid® Stand Mixer. Create a well using a spoon. Crack the eggs into the centre of the well. Using a fork, gently stir to break. Add salt.
Using the flat beater attachment, mix on low speed until the dough forms. Switch to the dough hook attachment. Turn to Speed 2 and knead for 2 minutes until the dough becomes elastic, yet a little sticky.
Wrap the dough ball in plastic wrap and rest for 30 minutes.
Cut the dough ball into 4 equal portions. Rewrap unused portions and set aside.
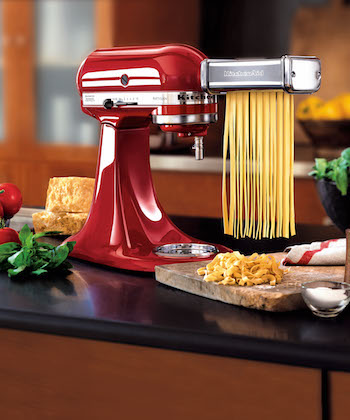
Attach the KitchenAid® Pasta Roller to the power hub of your Stand Mixer. Begin at the widest setting: “1.”
Take 1 dough ball and press it into a flat disc. Run the dough through the Pasta Roller twice. Switch the setting to “2” and run through twice again. Increase the settings on the Pasta Roller until setting “3.” Carefully cut the pasta strip in half.
Attach the Lasagnette Cutter from the KitchenAid® Pasta Cutter Set to the power hub of the Stand Mixer. Run the pasta through the cutter. Place cut pasta onto a lightly floured baking sheet. Continue with remaining dough.
For the Bolognese sauce
In a large, deep pan, add olive oil and heat over medium heat. Add the carrots, celery, garlic, mushrooms, and onion. Sauté over low heat for 20-25 minutes or until completely soft and tender. Stir as necessary.
Add the beef and the veal, season with salt and pepper and cook until completely brown. Once browned, add tomato paste and allow to brown, approximately 5 minutes. Once brown, add the wine. Allow to reduce by half. Season with salt.
Add enough water to cover the sauce by 1″. Simmer on low, stirring as necessary. When liquid levels are low, add more water. Continue cooking and reducing for a minimum of one hour.
The fresh pasta should be cooked immediately in a pot of salted boiling water for about 3-5 minutes. Plate and pour the Bolognese sauce on top. Serve immediately.
The recipe is taken from KitchenAid Cookbook
Ingredients:
(Makes 4-6 servings)
- 3 ounces cacao butter
- 1/2 cup pure maple syrup
- 2 13.5 ounce cans of full fat coconut milk, well shaken
- 2 cups non-dairy milk (almond, soy, etc.)
- 1 tablespoon pure vanilla extract
- 1/4 teaspoon fine sea salt
- 1/2 pint fresh raspberries
Directions
*Please make sure your ice cream maker has been frozen for at least 15 hours before attempting to make this recipe.
Add the cacao butter to the 1.5-quart saucepan from the KitchenAid® Hard Anodized Nonstick 10-Piece Set. Set the pan over medium heat and cook until melted.
Once melted, whisk in the maple syrup, coconut milk, non-dairy milk, vanilla extract, and salt. Bring the mixture to a light boil, cook for 10-15 minutes. Take off the heat.
Let the mixture cool to room temperature then transfer it to a large glass bowl, cover with plastic wrap, and refrigerate for at least 6-8 hours (overnight is best).
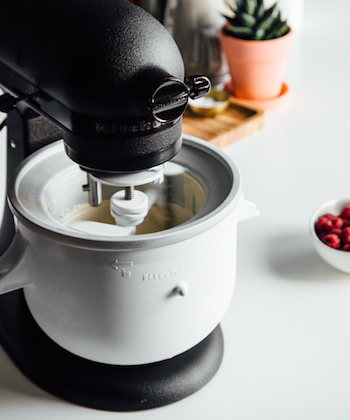
Once chilled, attach the KitchenAid® Ice Cream Maker Attachment onto the KitchenAid® Stand Mixer and fit with the dasher. Switch the Stand Mixer to stir and slowly pour in the ice cream base (if you don’t switch it on before pouring in the base, it will freeze almost instantly and you won’t be able to properly churn the ice cream). When every last drop of the base has been added, continue to churn until thick, about 25 minutes.
While the ice cream is churning, smash the raspberries using the back of fork. When the ice cream is finished, carefully fold in the smashed raspberries using a rubber spatula.
If you like your ice cream on the soft side, serve it immediately – with some aquafaba coconut whipped cream, cacao nibs, coconut flakes, and raspberries on top. If you prefer it on the hard side, transfer it to a freezer-safe container and press a piece of plastic wrap into the ice cream before covering the container with a lid.
Depending on the temperature of your freezer, you may need to thaw the ice cream for 15-20 minutes before serving. Ice cream will keep frozen for up to one month.
Brought to you in partnership with J Select