View All


 View All


 View All

 View All

Happy New Year to all you Sassy Mamas! January is all about being a little bit healthier, so I want to share my healthier cupcake recipe with you, which is a super moist and delicious Vegan Chocolate Cupcake recipe. This recipe is free from dairy and eggs, so in theory it is “healthier” and great for those who follow a vegan lifestyle!
As we’ll be celebrating both Valentine’s Day & Chinese New Year in February, I’ve put together a Valentine’s Day-themed cupcake for you to practice before the big day! I am sure your secret admirers will be super impressed with your homemade cupcakes as a way of saying “I love you!”
I can’t believe these are Vegan Chocolate Cupcakes!
Total time for baking and making vegan buttercream: 1 – 2 hours
Makes: 10-12 cupcakes
Ingredients:
162g organic plain flour
164g caster sugar
31.5g Hershey’s unsweetened cocoa powder (this is a vegan cocoa powder)
1 teaspoon baking soda
1/2 teaspoon salt
1 cup warm water
1 teaspoon vanilla extract
1/3 cup organic light olive oil
1 teaspoon organic apple cider vinegar or distilled white vinegar
Method:
You will be very pleased to know that you don’t need an electric mixer for this recipe!
- Preheat the oven to 180C and line your cupcake tray with pretty cupcake cases.
- Mix together plain flour, caster sugar, cocoa powder, baking soda, and salt with a fork or a whisk. Ensure it is mixed very well.
- In a separate bowl, combine the water, vanilla extract, olive oil and vinegar by gently mixing it together with a fork or a whisk.
- Pour the liquid mixture into the dry ingredients and use a spatula to mix well. The mixture is quite runny, just make sure you have no lumps.
- Fill the cupcake cases to just under 2/3 full, as you may find that you can only stretch the mixture to about 10 cupcake cases. Scrape the sides of the bowl to get every last drop of the cake mixture!
- Bake in the oven for about 15 – 18 minutes. Keep an eye on it at about 15 minutes in and you can start testing if the cakes are done by inserting a cocktail stick in the centre of the cupcakes. If the cocktail stick comes out clean they are ready to be taken out of the oven. Place them over a cooling rack and let them cool completely.
Fluffy Vegan Buttercream Frosting
Ingredients:
125g non-dairy margarine at room temperature (You can find it in Marks & Spencer)
125g vegetable shortening
2 teaspoons vanilla extract or another flavour of your choice
400g icing sugar
Food colouring of your choice (I used Wilton Pink Rose)
Tip: It’s best if you make this in a mixer or use a hand held electric mixer, unless you want to give your biceps a really good work out!
- Beat the vegetable shortening on medium/high speed for 15 minutes. It should be very fluffy and look like sour cream after you beat it for that long! Tip: As it is quite cold at the moment, the shortening might be a little bit lumpy. I find adding a warm wet towel on the base of the metal bowl helps.
- Now moving to your electric mixer. Use the paddle attachment and add the margarine and start beating at medium/high speed until the mixture has no lumps. You may have to spend a good 15 – 20 minutes to do this.
- Beat in the vanilla extract into the vegan butter mixture for 30 seconds.
- Add the icing sugar to the vegan butter mixture in 3 parts, mixing for at least 2 minutes after each addition to ensure that the icing is completely incorporated before adding the next third.
- When you have all of your sugar in, turn the mixer up to high speed and let it beat the vegan buttercream for a good 5 minutes to make it extra fluffy.
- Once you are happy with the consistency of your buttercream frosting (nice and fluffy!), add your food colouring. The key is to add small amounts first until you have reached your desired colour intensity.
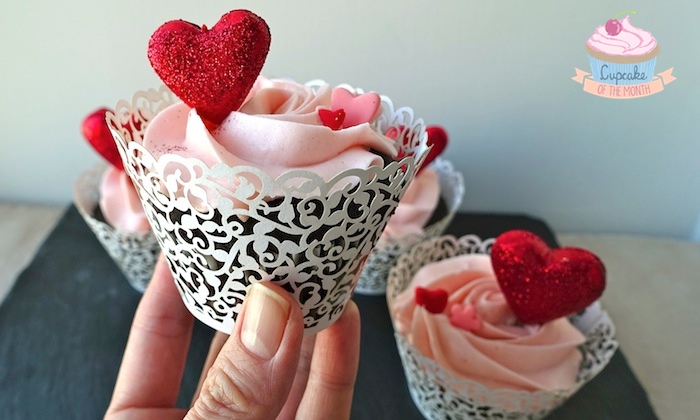
Love is in the air Valentine’s Cupcakes
I would make these cupcake toppers at least a day ahead, so that the fondant has enough time to harden properly.
Feel free to change the colour combination of the hearts and flowers, but I like the romantic red colour for Valentine’s Day!
You will need the following ingredients/equipment:
- Red fondant – it is easiest to buy this from a store, as it would take a lot of time and a lot of food colouring to achieve the bright red colour if you do it yourself.
- White fondant + food colouring if you are incorporating other colours
- Edible food grade glitter
- Heart-shaped cookie cutters & fondant stamps
- Cocktail sticks
- Cling film
- Optional: pretty cupcake wrappers and other decorative ready made flags
Step 1: Roll out about 1.5 cm thick of red fondant on a dusted surface. Tip: You can make your own “dust” by combining icing sugar & corn flour for this purpose.
Step 2: Here is a good trick for making a “3D bubble effect” when using fondant + fondant cutters! Place a piece of cling film over the rolled out fondant, press the heart-shaped cutter on top and press downward.
Step 3: Remove the cling film and take out the “3D bubble effect” heart-shaped fondant.
Step 4: Feel free to play around with the thickness of the rolled fondant in order to achieve your desired “3D bubble effect” heart shaped fondant! You can see in the photo that the one on the left is more prominent than the one on the right.
 Step 5: Insert a cocktail stick into the heart-shaped fondant, about half way through. You need to use delicate fingers to do this without pressing fingerprints onto the fondant! Place it over a tray or a plate which is lined with baking power or dust the surface to prevent the fondant from sticking down.
Step 6: Roll out another piece of red fondant to about 3-5 mm thick. Using your heart-shaped fondant stamps (I also have a flower fondant stamp which I have used), simply stamp out smaller pieces of heart-shaped fondant (or whatever shape you wish) and place them over a piece of baking paper / dusted surface for them to harden.
Step 7: By now your 3D bubble effect heart-shaped fondant should have hardened a little bit. Using a small brush / your clean index finger, dab the surface of the fondant with some water to make it sticky.
Step 8: Simply sprinkle the edible glitter over the sticky surface of the heart-shaped fondant! Tip: You may wish to do this over a plate / baking paper, so that you don’t get glitter everywhere!
 Step 10: Just before serving, ice your delicious vegan cupcakes using a Wilton 1M tip. Dress them up with a pretty cupcake wrapper and insert the 3D bubble effect heart-shaped fondant.
Get creative with the smaller pieces of heart-shaped fondant and dot them over the frosting swirl. I have added some ready made cupcake flags with personal messages to make these cupcakes even more romantic to gift to your hubby.
Happy Valentine’s Day everyone!